How to Replace Samsung Microwave Handle: Easy Step-by-Step Guide
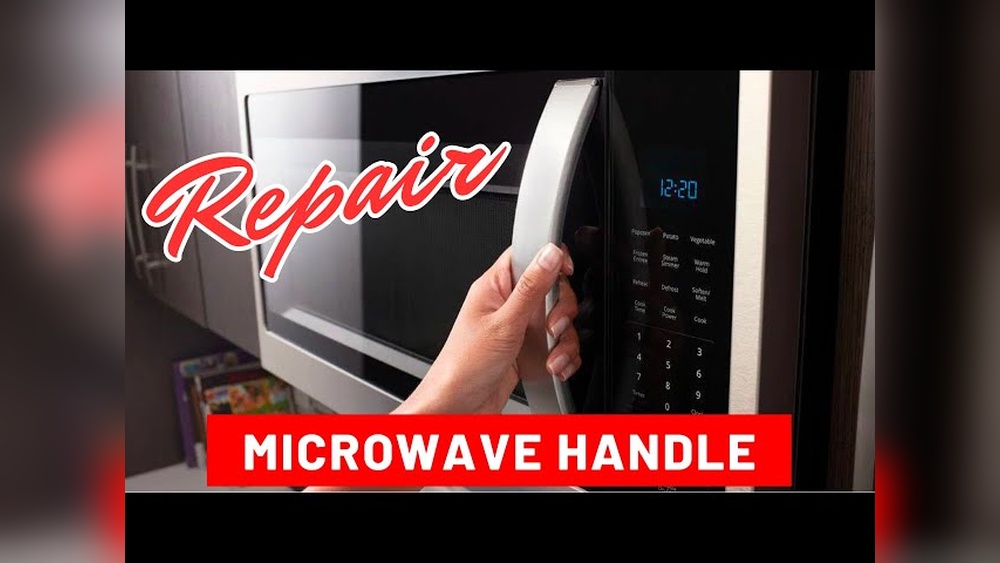
Is your Samsung microwave handle loose, cracked, or completely broken? You don’t have to live with it or rush out to buy a new microwave just yet.
Replacing the handle yourself is easier than you think—and it saves you time and money. In this guide, you’ll get clear, step-by-step instructions to swap out your old handle for a new one safely and quickly. By the end, you’ll have your microwave looking and working like new again.
Ready to take control and fix it yourself? Let’s get started!

Credit: www.youtube.com
Safety Precautions
Always unplug the microwave before starting to avoid electric shock. Handle screws carefully to prevent damage or injury. Use proper tools and work slowly for a safe handle replacement.
Replacing a Samsung microwave handle requires careful attention to safety. Microwaves use electricity, which can be dangerous if handled improperly. Taking safety steps helps prevent electric shocks and injuries. Before starting, prepare your workspace and tools for a safe repair process.
Unplug The Microwave
Always unplug the microwave before starting the repair. This stops electricity from flowing and reduces the risk of shock. Do not just turn off the microwave or use a power strip switch. Pull the plug from the wall socket completely. Check that the microwave is not receiving power by trying to turn it on.
Wear Protective Gear
Wear gloves to protect your hands from sharp edges and tools. Safety glasses are also recommended to protect your eyes from dust or small parts. Avoid loose clothing or jewelry that might get caught during the repair. Use a stable surface to place the microwave while working. These steps reduce injury chances and make the task safer.
Finding The Right Handle
Finding the right handle for your Samsung microwave is key for a smooth replacement. The handle must fit perfectly to work well and look good. Choosing the wrong handle can cause problems with opening or closing the door.
Start by knowing exactly which handle fits your model. Samsung makes many microwaves, and handles vary by model and year. Matching the handle to your specific microwave ensures safety and function.
Locate Model Number
Find the model number on your microwave to get the right handle. It is usually inside the door frame or on the back. Write down the model number carefully.
This number helps identify the exact handle style you need. Without it, you risk ordering a wrong part. Check the label or sticker for a clear model code.
Order Compatible Replacement
Use the model number to search for a compatible replacement handle. Many online stores sell parts by model number. Choose a handle made for your microwave’s model for best fit.
Check product details to confirm compatibility. Avoid generic handles that may not fit or last long. Ordering the correct handle saves time and frustration.
Tools Needed
Replacing a Samsung microwave handle requires a few basic tools. These tools help you remove the old handle and fix the new one securely. Having the right tools saves time and makes the process smooth. Below are the essential tools you will need for this task.
Screwdrivers
Screwdrivers are a must-have for removing and installing screws on the microwave door. A Phillips head screwdriver fits most microwave screws. Some models may need a flathead or Torx screwdriver. Choose the correct size to avoid stripping the screws.
Pliers
Pliers help hold nuts or screws tightly while you unscrew or tighten them. They come in handy if screws are hard to turn or if the handle parts are small. Needle-nose pliers work best for tight spaces and precision gripping.
Putty Knife Or Flathead
A putty knife or a small flathead screwdriver helps pry off trim pieces covering the screws. Use it gently to avoid breaking plastic parts. This tool is useful to access hidden screws behind the microwave door trim.
Removing The Old Handle
Removing the old handle from your Samsung microwave is the first step in the replacement process. This task requires care to avoid damaging the door or trim. Take your time and prepare the right tools before starting.
Ensure the microwave is unplugged to keep the work safe. Handle removal usually involves taking off any covers, unscrewing the mounting screws, and then detaching the handle itself.
Pry Off Trim Or Covers
Start by gently prying off the trim or screw covers that hide the mounting screws. Use a flathead screwdriver or a plastic pry tool to avoid scratching the surface. Work slowly around the edges to loosen the trim without breaking it.
Unscrew Mounting Screws
With the trim removed, locate the screws holding the handle in place. Use a Phillips head screwdriver or the tool that fits your microwave model. Turn the screws counterclockwise to remove them. Keep the screws safe for reuse or replacement.
Detach The Handle
After unscrewing, carefully pull the handle away from the microwave door. It may need a slight wiggle to come free. Avoid forcing it to prevent damage to the door or the handle mount.
Installing The New Handle
Installing the new handle on your Samsung microwave is a simple process. It requires careful alignment and gentle handling to avoid damage. Follow these steps to ensure a secure and neat installation.
Align Handle On Door
Place the new handle against the microwave door. Match the screw holes on the handle with those on the door. Check that the handle sits flush and straight. Proper alignment prevents strain on screws and plastic parts.
Hand-thread Screws
Insert the screws into the holes by hand first. Turn them slowly to start threading. This prevents cross-threading and damage to plastic. Hand-threading makes it easier to tighten screws later.
Tighten Screws Carefully
Use a screwdriver to tighten the screws. Do not force or overtighten them. Tight screws hold the handle firmly but avoid cracking plastic parts. Stop tightening as soon as the handle feels secure.
Replace Trim Or Covers
Snap the trim or screw covers back into place. These protect screws and give a finished look. Make sure the trim fits snugly without gaps. A clean finish improves the microwave’s appearance and safety.

Credit: www.amazon.com
Testing And Final Checks
After installing the new handle on your Samsung microwave, performing thorough testing and final checks is essential. These steps confirm the handle is securely attached and functions properly. Testing avoids any future inconvenience or damage.
Focus on checking the handle’s operation and stability. Make sure it opens and closes smoothly. A solid handle prevents accidents and enhances safety.
Plug In And Test Handle
First, plug the microwave back into the power outlet. Check if the microwave powers on correctly. Open and close the door using the new handle. The handle should feel firm and easy to grip. Test several times to confirm smooth operation. Listen for any unusual noises or resistance.
Check Stability
Press lightly and firmly on the handle from different angles. The handle should not wiggle or feel loose. Tighten screws slightly if needed, but avoid overtightening. Inspect the trim pieces to ensure they fit snugly. Confirm the handle is aligned properly on the door. A stable handle guarantees long-lasting use and safety.
Troubleshooting Tips
Replacing a Samsung microwave handle may bring some challenges. Simple issues like stuck screws or hard-to-remove trim can slow you down. Knowing how to handle these problems keeps your repair smooth and safe.
Some models require extra steps, like detaching the door. These tips help you avoid damage and finish the job faster. Follow these easy tricks to fix common hurdles.
Loosening Stuck Screws
Stuck screws are common during handle replacement. Use a penetrating lubricant on the screw heads. Let it sit for a few minutes to work properly.
Apply gentle heat with a hairdryer to soften any glue or residue. Turn the screws slowly using the right screwdriver. Avoid forcing them to prevent stripping.
Removing Difficult Trim
Trim pieces often hold the screws and can be tough to remove. Use a small flathead screwdriver or a putty knife. Gently pry around the edges to release the clips.
Work slowly and carefully to avoid cracking the plastic trim. If the trim resists, try loosening one side before moving to the next.
Detaching The Door If Needed
Some Samsung microwave models require door removal for full handle access. Check your model’s manual to confirm this step. Usually, the door hinges have screws or clips to release.
Support the door firmly while removing screws. Place the door on a soft surface to protect the glass. This extra step makes handle replacement easier and safer.

Credit: www.ebay.com
Additional Resources
Additional resources help you replace your Samsung microwave handle with ease. They offer clear visuals and expert tips. These resources support your repair process and reduce mistakes. Use them to gain confidence and ensure a smooth handle replacement.
Video Tutorials
Video tutorials show each step in detail. Watching a video helps you understand the tools and techniques. Many videos include tips to avoid common problems. Choose videos specific to your Samsung microwave model. Pause and replay sections to follow along at your own pace.
Expert Advice Links
Expert advice links provide professional guidance and troubleshooting tips. These articles cover handle replacement and related microwave repairs. Experts explain safety measures and tool recommendations. They often share answers to common questions from users. Reading these links improves your knowledge and skill before starting the repair.
Frequently Asked Questions
Can You Replace Just The Handle On A Microwave?
Yes, you can replace just the microwave handle. Unplug the microwave first, remove screws, detach the old handle, and install the new one securely.
Can You Replace Door Handles Yourself?
Yes, you can replace door handles yourself by unscrewing the old handle and installing a new one. Follow instructions carefully and use proper tools.
Is It Worth Repairing A Microwave Door?
Repairing a microwave door is worth it if the cost is lower than buying new. Fix small issues promptly.
Conclusion
Replacing a Samsung microwave handle is simple with the right steps. Always unplug the microwave before starting for safety. Use the correct replacement handle made for your model. Carefully remove screws and old handle without breaking parts. Attach the new handle securely but do not overtighten.
Finally, test the handle to ensure it works well. Taking your time makes the job easier and safer. Now you can fix your microwave handle yourself with confidence.