How to Replace a Ge Microwave Light Bulb: Quick & Easy Guide
Is your GE microwave light bulb burnt out and leaving your cooking space dim? Replacing that tiny bulb might seem tricky, but you can do it yourself quickly and safely.
In this guide, you’ll learn exactly how to replace your GE microwave light bulb step-by-step—no technical skills needed. Imagine enjoying bright, clear light inside your microwave again, making it easier to check on your food without opening the door. Keep reading, and you’ll have your microwave shining bright in no time.
Bulb Types For Ge Microwaves
Choosing the right bulb for your GE microwave is important. The bulb must handle heat well and fit the socket. Different types offer unique benefits. Understanding these can help you pick the best option for your microwave light replacement.
Incandescent Vs Led
Incandescent bulbs are the classic choice. They provide warm light but use more energy. These bulbs get hotter and have shorter lifespans. LED bulbs are energy-efficient and last longer. They produce less heat and save electricity. LEDs often cost more upfront but save money over time.
Heat Resistance Needs
Microwave bulbs must resist heat from cooking. Incandescent bulbs can handle heat but may burn out faster. LED bulbs are cooler and more durable under heat. Always select bulbs labeled for microwave or appliance use. This ensures safety and reliable performance.
Dimmable Options
Dimmable bulbs let you adjust light brightness. This feature adds flexibility to your microwave lighting. Not all microwave bulbs are dimmable. Check packaging or product details before buying. Using non-dimmable bulbs in dimmer fixtures can cause flickering or damage.
Finding The Right Replacement Bulb
Finding the right replacement bulb for your GE microwave is essential for proper lighting and safety. Using the correct bulb ensures your microwave works well and lasts longer. This process starts with simple steps that help you pick the perfect bulb without hassle.
Checking The Owner’s Manual
The owner’s manual is the best source for bulb details. It lists the exact type and size needed. Manuals often include the bulb wattage and shape. If you lost the manual, try to find it online on the GE website. This step saves time and prevents buying the wrong bulb.
Identifying Model Number
Locate your microwave’s model number for accurate bulb matching. The model number is usually inside the microwave door frame. Write down this number before searching for parts. It helps in finding bulbs made specifically for your microwave model. This avoids compatibility issues and fits perfectly.
Where To Buy
Buy your replacement bulb from trusted sources only. Authorized GE dealers and appliance stores carry the correct bulbs. Online retailers like Amazon or GE’s official site offer many options. Ensure the seller has good reviews and genuine products. Avoid cheap, generic bulbs that may fail quickly.
Tools Required
Before replacing the light bulb in your GE microwave, gather the necessary tools. Having the right tools makes the task easier and safer. This section lists the basic tools needed for this job.
Screwdrivers
A Phillips-head screwdriver is essential for removing the light cover screws. Avoid power screwdrivers. They can strip screws or damage parts. Use a manual screwdriver for better control.
Gloves Or Cloth
Wear gloves or use a clean cloth when handling the bulb. This prevents oils from your skin from damaging the new bulb. It also protects your hands from sharp edges inside the microwave.
Replacement Bulb
Choose the correct replacement bulb for your GE microwave. Check your microwave’s manual or model number. Most use a candelabra-base, heat-resistant bulb. LED bulbs are a good energy-saving option.
Safety Precautions
Replacing a GE microwave light bulb requires attention to safety. The microwave uses electricity and fragile parts. Taking precautions prevents shocks and injuries. Follow these simple steps to stay safe while changing the bulb.
Unplugging The Microwave
Always unplug the microwave before starting. This stops electricity flow and avoids shocks. Even if the microwave seems off, power can still flow inside. Pull the plug from the outlet, not the cord, for safety.
Avoiding Glass Contact
The microwave bulb is made of delicate glass. Avoid touching the glass part with bare hands. Oils from skin can cause the bulb to heat unevenly and break. Use a clean cloth or gloves to handle the new bulb.
Handling Screws Carefully
Remove screws slowly and keep them in a safe place. Loose screws can fall inside the microwave and cause damage. Use the right screwdriver to avoid stripping the screws. Handle all parts gently to prevent breaking.
Removing The Light Cover
Removing the light cover is the first step to replace the bulb in your GE microwave. This process gives you access to the bulb socket. Handle the cover carefully to avoid damage or injury. Follow these steps to remove the cover safely and easily.
Locating The Cover
Open the microwave door. Look above or inside near the light area. The light cover is usually a small, clear or white plastic piece. It protects the bulb from heat and spills. Check for any screws or clips holding it in place.
Unscrewing The Fasteners
Use a screwdriver to remove screws if present. Turn screws counterclockwise to loosen them. Keep screws in a safe place for reassembly. Avoid using a power screwdriver to prevent damage. If there are clips, gently press or slide them to release the cover.
Opening The Cover Hinge
Some covers open on a hinge. After unscrewing, carefully pull the cover away from the microwave. It may swing open without detaching completely. Hold the cover to prevent it from falling. This step exposes the bulb socket for easy replacement.
Removing The Old Bulb
Removing the old bulb from your GE microwave is the first step to a successful replacement. The process is simple and requires care to avoid damage to the microwave or the new bulb.
Always ensure the microwave is unplugged before starting. This prevents any electrical accidents while handling the bulb.
Pulling Out The Bulb
Locate the bulb cover inside the microwave. It may be held by a small screw or clips.
Use a screwdriver if needed to remove the cover gently. Avoid forcing it, as this can break the cover or damage the microwave.
Once the cover is off, grip the bulb carefully. Pull it straight out without twisting to avoid breaking it.
If the bulb is stuck, wiggle it gently while pulling. Be patient to prevent damage.
Inspecting The Socket
After removing the bulb, check the socket for dirt or damage. Dust can block the electrical connection.
Use a dry cloth to clean the socket gently. Avoid using water or cleaning liquids.
Look for signs of corrosion or wear. If the socket is damaged, it may need professional repair.
Ensuring the socket is clean and intact helps the new bulb work properly and last longer.
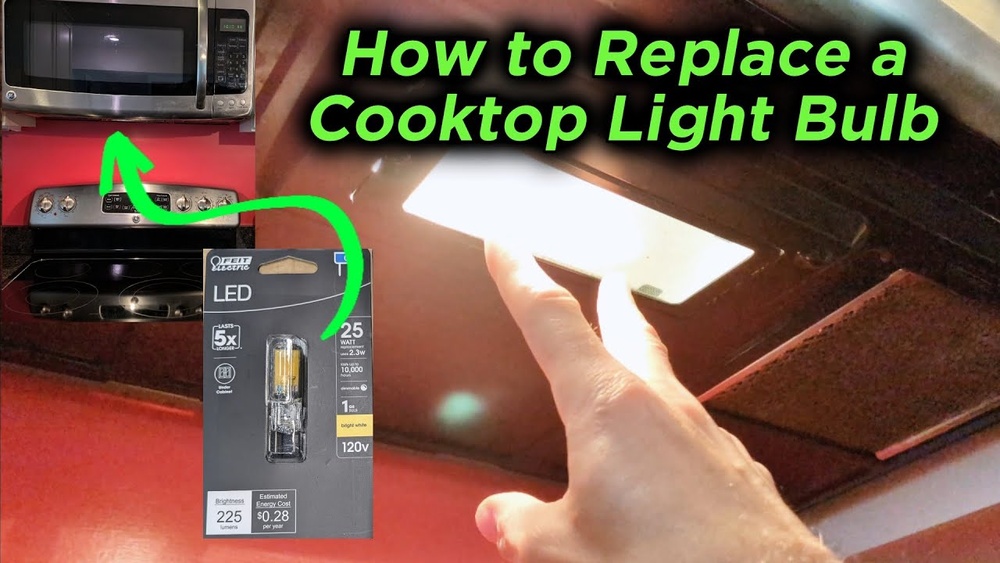
Installing The New Bulb
Installing the new bulb in your GE microwave is a simple task that requires care. Proper installation ensures the bulb works well and lasts long. Follow these steps closely to avoid damage and get the best results.
Inserting Without Touching Glass
Wear clean gloves or use a cloth to hold the new bulb. Avoid touching the glass part with your fingers. Oils from skin can cause the bulb to burn out faster. Gently align the bulb with the socket inside the microwave. Push it in slowly until it fits snugly.
Securing The Bulb In Place
Check that the bulb sits firmly in the socket. If your microwave has a bulb cover, replace it carefully. Fasten any screws or clips that hold the cover in place. Make sure everything is tight but avoid over-tightening. This prevents the bulb from moving or falling out during use.

Credit: www.amazon.com
Reassembling The Light Cover
Reassembling the light cover is the final step after replacing the bulb. It protects the new bulb and keeps the microwave safe. Handle the cover carefully to avoid damage or misalignment. Follow these simple steps to secure the cover properly.
Closing The Cover
Gently lift the light cover back into place. Align the cover so it fits snugly over the bulb. Make sure the hinge or clips hold the cover securely. Avoid forcing the cover, which can cause cracks or breaks.
Screwing Fasteners Back
Use a screwdriver to tighten the screws that hold the cover. Turn each screw slowly and evenly. Tighten just enough to keep the cover stable. Do not over-tighten, as this may strip the screws or crack the cover.
Testing The New Bulb
Testing the new bulb is a crucial step after replacing it in your GE microwave. This ensures the bulb works correctly and that the installation was successful. Follow simple steps to check the light without any risk of damage.
Plugging In The Microwave
First, plug the microwave back into the power outlet. Make sure the cord is fully inserted. Avoid using a loose or faulty socket as it might cause electrical issues.
Turning On The Light
Open the microwave door or use the light button if available. The bulb should light up immediately. If it glows, the replacement was successful. If not, proceed to troubleshooting.
Troubleshooting
Check if the bulb is seated properly in its socket. Remove and reinsert it carefully. Inspect the bulb for any visible damage. Confirm the microwave is receiving power. If the light still does not work, the issue might be with the socket or wiring.

Credit: www.amazon.com

Credit: www.youtube.com
Frequently Asked Questions
How Do I Replace The Lightbulb In My Ge Microwave?
Unplug your GE microwave first. Remove the light cover using a screwdriver. Pull out the old bulb carefully. Insert a new, compatible bulb without touching the glass. Replace the cover and plug the microwave back in. Test the light to ensure it works properly.
How To Remove Microwave Light Cover?
Use a screwdriver to remove the screw securing the light cover. Gently open the cover, which hinges on one side. Avoid using a power screwdriver to prevent screw damage.
How Do You Remove The Lightbulb Cover On A Ge Oven?
To remove the lightbulb cover on a GE oven, first unplug the oven. Then, gently pull or twist the cover to detach it. Use a screwdriver if screws secure the cover. Handle carefully to avoid damage. Replace the bulb and reattach the cover securely.
Conclusion
Replacing a GE microwave light bulb is simple and quick. Follow the steps carefully to avoid damage. Use the right bulb type for safety and best results. Always unplug the microwave before starting the task. Clean your hands or wear gloves to keep the bulb clean.
A working light makes cooking easier and safer. Keep your microwave well-lit and enjoy better kitchen visibility. Regular checks help you spot when it’s time to replace the bulb again. Small fixes like this save money and extend your microwave’s life.