How to Remove Over the Range Microwave: Easy Step-by-Step Guide
Thinking about removing your over-the-range microwave but not sure where to start? You’re not alone.
Many homeowners hesitate because it seems tricky or risky. But here’s the truth: with the right steps, you can safely and confidently remove your microwave without calling a pro. In this guide, you’ll learn exactly how to take down your over-the-range microwave, what tools you’ll need, and important safety tips to keep in mind.
By the end, you’ll be ready to tackle the job yourself and make way for a new upgrade or simply free up your kitchen space. Keep reading to discover the simple process that anyone can follow!

Credit: www.wikihow.com
Tools And Materials Needed
Removing an over-the-range microwave requires specific tools and materials. Preparing these items before starting makes the process safer and easier. Gather everything needed to avoid interruptions during removal.
Having the right tools helps protect your cabinets and microwave. It also reduces the risk of injury. Below is a list of common tools and materials for this job.
Safety Gear
Use safety glasses to protect your eyes from dust and debris. Wear gloves to avoid cuts and scrapes. A dust mask can help if you are sensitive to dust.
Screwdrivers
A set of screwdrivers is essential. Phillips head and flat head screwdrivers work for most microwave screws. Choose the correct size to prevent stripping screws.
Socket Wrench
A socket wrench helps remove bolts securing the microwave. Check the microwave manual for the bolt size. This tool makes loosening bolts faster and easier.
Drill
A cordless drill speeds up removing screws and bolts. Use drill bits that fit the screw heads. A drill can also help detach the mounting bracket.
Stud Finder
Use a stud finder to locate wall studs. The microwave mounting bracket is attached to these studs. Finding them helps when removing or reinstalling the microwave.
Helper Or Support
Microwaves are heavy and bulky. Have a helper hold the microwave during removal. Support prevents dropping and damage to the appliance or cabinets.
Flashlight
A flashlight improves visibility in tight spaces. It helps locate screws and wiring behind the microwave. Use one for safer and quicker removal.
Safety Precautions
Removing an over-the-range microwave requires careful attention to safety. This task involves electrical components and heavy lifting. Taking proper safety steps protects you from injury and damage. Follow these precautions before starting the removal process.
Turn Off The Power Supply
Locate the circuit breaker for the microwave. Switch it off to cut the power. Do not rely on just unplugging the microwave. This prevents accidental electric shocks during removal.
Use Proper Tools And Equipment
Gather all necessary tools before you begin. Use a sturdy ladder to reach the microwave. Wear gloves to protect your hands from sharp edges. Have a helper assist you to handle the microwave safely.
Check For Wall Studs And Mounting Hardware
Identify where the microwave is anchored. Use a stud finder to locate wall studs. Removing screws from studs ensures the microwave comes off securely. Avoid forcing the microwave loose to prevent wall damage.
Handle The Microwave With Care
Support the microwave from underneath while loosening screws. Keep a firm grip to avoid dropping it. Move slowly to maintain control. Set the microwave down on a flat, stable surface once removed.
Prepare The Microwave Area
Preparing the area around your over-the-range microwave is the first step before removal. This preparation ensures safety and makes the process smoother. Clear space and cut power are essential tasks to start with.
Take time to organize your workspace. It helps prevent accidents and damage to nearby items.
Clear The Surrounding Space
Remove all items near the microwave. This includes kitchen utensils, cookware, and decorative objects.
Clear the stovetop and counters below the microwave. This space should be free to allow easy access and movement.
Clearance prevents accidental spills or damage during removal. It also gives you room to place tools and the microwave safely.
Turn Off Power Supply
Locate the circuit breaker that controls the microwave’s power. Switch it off to cut electricity to the appliance.
Unplug the microwave from the wall outlet if possible. This adds an extra layer of safety from electrical hazards.
Double-check that the microwave is not powered by testing the buttons or display. No lights or sounds mean it is safe to proceed.

Credit: www.youtube.com
Access Mounting Hardware
Accessing the mounting hardware is a key step in removing an over-the-range microwave. This hardware secures the microwave to the cabinet and wall. You must find and remove these fasteners carefully. Doing so ensures the microwave can be safely taken down without damage.
Start by opening the cabinet above the microwave. This gives you room to reach the mounting bolts. The bolts hold the microwave tightly in place. Locating and removing them frees the microwave from the cabinet.
Open Cabinet Above Microwave
Open the cabinet door above the microwave. Clear any items inside to avoid dropping them. Look at the cabinet floor for mounting bolts. These bolts pass through the cabinet and hold the microwave. Having clear access here makes the next steps easier and safer.
Locate Mounting Bolts
Look for three or more large bolts near the front edge of the cabinet floor. These bolts go through the cabinet and secure the microwave. Use a wrench or socket tool to loosen them. Support the microwave front as you remove the bolts. This prevents the microwave from falling suddenly.
Remove Mounting Bolts
Removing the mounting bolts is a key step in taking down your over the range microwave. These bolts keep the microwave firmly attached to the cabinet above your stove. Handle this step carefully to avoid damage or injury.
Support The Microwave Front
Before unscrewing any bolts, support the microwave’s front side. Use one hand or ask for help to hold it steady. This prevents the microwave from falling once the bolts are removed. Keep a firm grip to control its weight and movement.
Unscrew The Bolts
Locate the mounting bolts near the front edge under the cabinet. Use a screwdriver or drill to unscrew each bolt slowly. Remove all bolts completely to free the microwave from the cabinet. Keep the bolts safe for future use or disposal.
Disconnect Electrical Connections
Disconnecting the electrical connections is a crucial step before removing an over-the-range microwave. Safety should be your top priority to avoid any electrical hazards. This process involves unplugging the microwave and handling the wiring with care. Proper disconnection ensures you can safely remove the appliance without damage or risk.
Unplug The Microwave
Locate the microwave’s power cord. It is usually plugged into an outlet inside the cabinet above the microwave. Gently pull the plug from the outlet to disconnect the microwave from power. Avoid yanking the cord to prevent damage. If you cannot reach the outlet, use a step stool for better access. Make sure the microwave is fully unplugged before continuing.
Handle Wiring Safely
Some over-the-range microwaves are hardwired instead of using a plug. In this case, turn off the circuit breaker that controls the microwave’s electrical supply. Confirm the power is off with a voltage tester. Carefully disconnect the wiring by loosening the wire nuts or screws. Keep the wires separated and avoid touching exposed metal parts. Proper handling prevents electric shock and prepares the microwave for removal.
Detach Microwave From Wall Bracket
Detaching the microwave from the wall bracket is a crucial step in removing an over-the-range microwave. This process requires careful handling to avoid damage to the unit and the wall. Start by supporting the microwave securely to prevent it from falling once it is free from the bracket.
Make sure the microwave is unplugged before you begin. Removing the mounting bolts first allows you to safely tilt and lift the microwave off the bracket. Follow these clear steps to detach your microwave with ease.
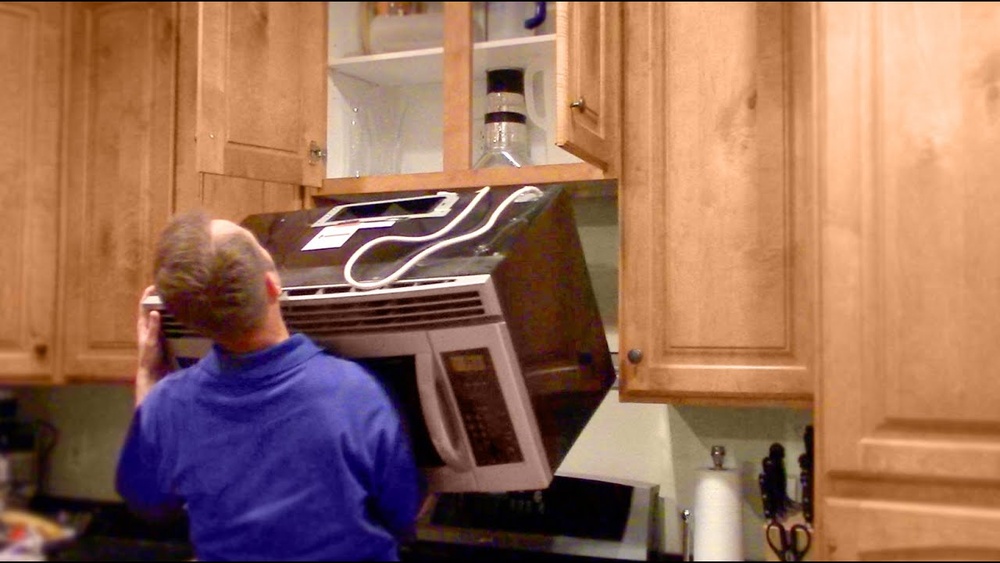
Tilt Microwave Forward
Hold the microwave firmly on both sides. Slowly tilt the front of the microwave downward. This movement releases the bottom tabs from the wall bracket. Keep the microwave steady to avoid slipping. Tilting forward creates space to access the mounting points.
Lift Off The Wall Tabs
After tilting, lift the microwave straight up. The back of the microwave will clear the wall tabs. Pull the microwave away from the wall carefully. This step frees the microwave from the bracket completely. Place the microwave on a secure surface to prevent damage.

Credit: www.premiumhomesource.com
Remove Microwave Completely
Removing an over the range microwave fully requires careful handling. This step ensures no damage to the microwave or kitchen setup. Follow each step slowly to keep safety a priority.
Carefully Lower Microwave
Hold the microwave firmly from both sides. Slowly lower it from the mounting bracket. Keep the microwave level to avoid spills or damage. Use steady hands and move with care. This step prevents the microwave from dropping suddenly.
Set Microwave Aside
Place the microwave on a stable surface nearby. Ensure the spot is clear and secure. Avoid putting it where it might fall or get damaged. This keeps the microwave safe while you work on the kitchen. Now you can proceed with disconnecting wires or cleaning the area.
Cleanup And Inspection
After removing your over the range microwave, cleanup and inspection are essential steps. This process ensures your kitchen area stays safe and ready for the next appliance. A thorough check prevents future problems and keeps your space looking neat.
Inspect Mounting Area
Look closely at the wall and cabinet where the microwave was attached. Check for holes, cracks, or damage from screws and bolts. See if the mounting bracket is still secure or needs replacing. Make sure the wall is dry and free from mold or rust. This inspection helps you plan any repairs before installing a new microwave.
Clean Surrounding Surfaces
Remove dust, grease, and grime from the wall, cabinet bottom, and the hood vent area. Use a mild cleaner and a soft cloth to avoid damage. Clean the vent filter if your microwave had one. Wipe down any stains or food splatters that may have built up over time. Clean surfaces improve kitchen hygiene and prepare the area for a fresh start.
Frequently Asked Questions
How To Detach An Over-the-range Microwave?
Open the cabinet above the microwave. Support the microwave front. Remove the bolts securing it to the cabinet. Lean it forward, unplug, then lift the back off the wall plate tabs. Pull the microwave free carefully.
What Holds An Over-the-range Microwave In Place?
An over-the-range microwave stays secure with a mounting bracket attached to wall studs. Bolts fasten it to the cabinet above. The bracket and bolts together hold the microwave firmly in place above the stovetop.
How To Get A Microwave Off The Bracket?
Support the microwave’s front, then unscrew the bolts securing it to the cabinet above. Tilt it forward, unplug, and lift the back off the wall bracket to remove.
Conclusion
Removing an over-the-range microwave can be simple with the right steps. Always support the microwave before loosening bolts. Unplug the appliance carefully to avoid any hazards. Take your time to lift it off the wall bracket gently. Proper tools and safety measures make the task easier.
Following these tips helps you remove your microwave smoothly. Now, you can install a new unit or clean the space with confidence. Safe and careful work leads to great results every time.