How to Install Vent for Over the Range Microwave: Easy Step-by-Step Guide
Installing a vent for your over-the-range microwave might seem tricky, but with the right steps, you can do it yourself and improve your kitchen’s airflow instantly. Whether you want to vent smoke and odors outside or simply recirculate air back into your kitchen, this guide will walk you through everything you need to know.
You’ll learn how to set up the vent properly, what tools to use, and how to handle common challenges along the way. Keep reading, and by the end, you’ll have the confidence to install your microwave vent like a pro—saving money and boosting your kitchen’s comfort.
Preparing For Installation
Preparing for the installation of a vent for your over the range microwave is a crucial first step. It ensures the process goes smoothly and safely. This phase involves gathering the right tools, measuring your space, and understanding your venting options. Taking time here saves effort and prevents mistakes later.
Gathering Tools And Materials
Collect all necessary tools before you start. Common tools include a drill, screwdriver, tape measure, and level. You will also need vent pipes, duct tape, and mounting brackets. Having these items ready helps you work efficiently and reduces interruptions.
Measuring Space And Clearance
Measure the area where the microwave will go carefully. Check the height, width, and depth to ensure proper fit. Verify clearance around the microwave for safety and ventilation. Correct measurements avoid fitting problems and ensure good airflow.
Checking Venting Options
Identify the type of venting that suits your kitchen. Options include venting outside or recirculating air back into the room. Look for existing ductwork to connect the vent easily. Choose the option that fits your kitchen layout and local building codes.

Credit: www.youtube.com
Setting Up Venting System
Setting up the venting system for your over-the-range microwave is an essential step. It ensures proper airflow and removes smoke, steam, and odors from your kitchen. A well-installed vent improves air quality and microwave performance. Follow these key steps carefully to create a functional venting system.
Choosing Vent Location
Select a vent location that leads outside your home. The vent should avoid long, twisting duct runs. Short, straight paths work best for airflow. Check for walls or ceilings without obstacles. Choose a spot near the microwave’s exhaust port. This reduces the need for extra ductwork.
Cutting Ductwork Openings
Mark the spot where the duct will pass through. Use a stud finder to avoid cutting into beams or pipes. Measure twice before cutting. Use a drywall saw or hole saw to make the opening. Keep the hole size just large enough for the duct. Clean edges help secure the duct tightly.
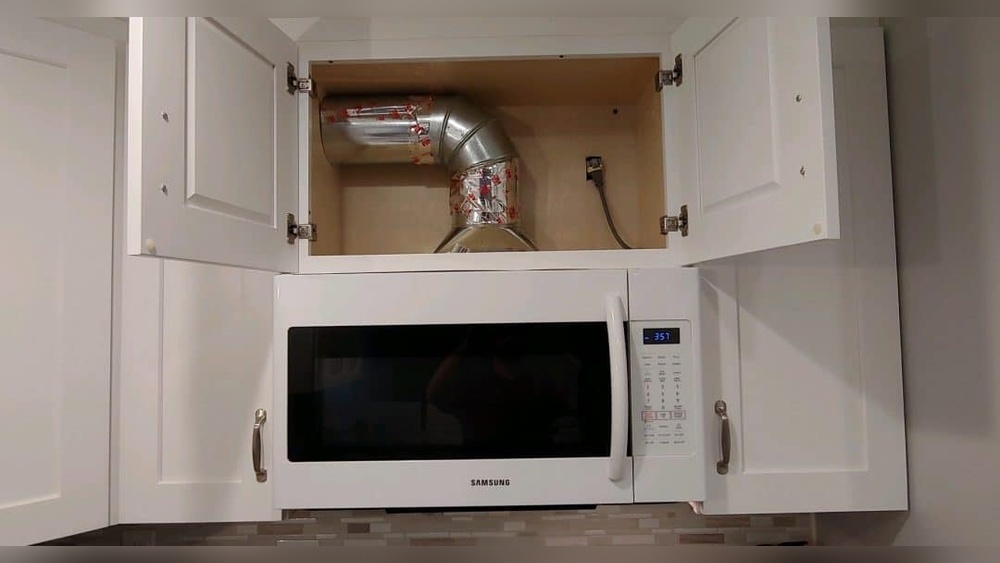
Installing Vent Ducts
Attach the vent duct to the microwave’s exhaust outlet. Use metal foil tape to seal all connections. Avoid using duct tape as it degrades over time. Secure the duct with screws or clamps for stability. Route the duct to the outside vent opening. Insulate ducts running through unheated spaces to prevent condensation.
Mounting The Microwave
Mounting the microwave correctly is key to a safe and functional kitchen setup. It ensures the appliance stays secure while venting properly. Follow these steps carefully to mount your over-the-range microwave.
Attaching Mounting Bracket
Locate the studs in your wall using a stud finder. Align the mounting bracket with the studs for strong support. Use a level to make sure the bracket is straight. Secure the bracket with heavy-duty screws into the studs. Tighten screws firmly so the bracket will not shift.
Securing Microwave To Wall And Cabinet
Lift the microwave carefully and hook it onto the mounting bracket. Make sure the microwave sits flush against the wall. Open the cabinet above and find the mounting holes. Use screws to attach the top of the microwave to the cabinet. Check that all screws are tight and the microwave is stable.
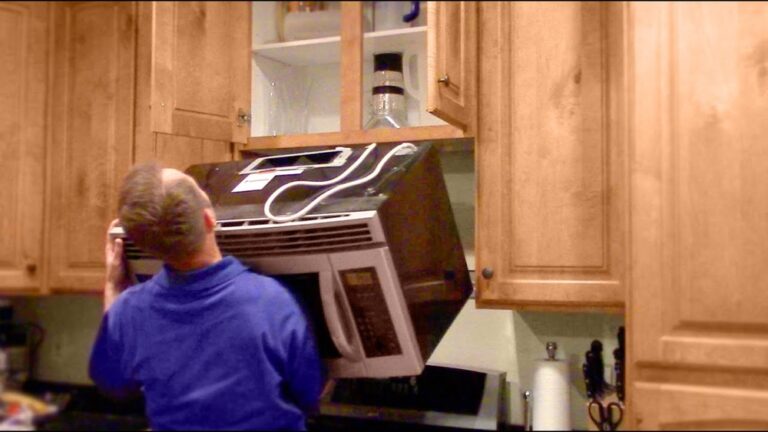
Using A Helper For Safety
Microwaves can be heavy and awkward to hold alone. Ask a helper to hold the microwave steady while you secure it. This prevents accidents and damage to the appliance or wall. Working as a team makes the installation faster and safer for everyone.

Credit: www.naturalhandyman.com
Connecting Electrical Components
Connecting the electrical components is a vital step when installing a vent for an over-the-range microwave. Proper electrical setup ensures the microwave works safely and efficiently. This section guides you through locating the power source, wiring the microwave, and testing all electrical connections.
Locating Power Source
Find the nearest electrical outlet or junction box. Most over-the-range microwaves need a dedicated 120-volt circuit. Check behind your stove or cabinet area for existing wiring. Turn off the power at the breaker before handling any wires. Use a voltage tester to confirm no electricity flows.
Wiring The Microwave
Follow the manufacturer’s wiring diagram carefully. Connect the black (hot) wire from the microwave to the black house wire. Attach the white (neutral) wire to the white house wire. Connect the green or bare copper wire to the ground. Use wire nuts to secure connections tightly. Wrap wires with electrical tape for safety. Tuck the wires neatly inside the junction box.
Testing Electrical Connections
Restore power at the breaker panel. Turn on the microwave’s power switch. Check if the microwave lights and fan operate properly. Use a voltage tester to verify correct current flow. Listen for unusual sounds or smells. If anything seems wrong, turn off power immediately and recheck wiring. Proper testing prevents hazards and ensures smooth operation.
Setting Up Recirculation Option
Setting up the recirculation option allows your over-the-range microwave to vent air back into the kitchen. This setup is ideal when you cannot vent outside. It uses charcoal filters to clean the air before releasing it. Proper installation ensures better air quality and reduces odors.
Installing Charcoal Filters
Start by locating the filter slots inside the microwave vent. Insert the charcoal filters firmly in place. These filters trap smoke and odors during cooking. Replace charcoal filters every six months for best results. Always use filters designed for your microwave model.
Sealing Recirculation Path
Seal the vent path inside the microwave carefully. Use aluminum tape or a similar sealant around edges. This prevents air leaks and improves airflow efficiency. Check for gaps or loose parts around the vent area. A tight seal helps the microwave work quietly and effectively.
Adjusting Fan Settings
Set the fan speed according to your cooking needs. Most microwaves offer low, medium, and high fan speeds. Use higher speeds for heavy cooking or frying. Lower speeds work well for simmering or light cooking. Adjusting fan settings helps control noise and air circulation.

Credit: www.youtube.com
Final Adjustments And Testing
After installing the vent for your over-the-range microwave, the final steps ensure everything works properly. These steps help confirm the vent moves air efficiently and the microwave operates safely. Proper sealing and finishing complete the installation for a clean look.
Checking Vent Operation
Turn on the vent fan at the highest setting. Place your hand near the vent outlet to feel airflow. The air should move steadily without interruption. Listen for unusual noises like rattling or buzzing. These sounds may mean loose parts or blockages. Adjust the vent cover if airflow seems weak or uneven. Confirm the vent directs air outside or recirculates properly, based on your setup.
Testing Microwave Functions
Test all microwave buttons and settings. Start with the timer and power levels to check responsiveness. Use the microwave to heat a cup of water. Watch for normal operation without sparks or errors. Check the light inside the microwave turns on and off correctly. Ensure the fan automatically starts when the microwave runs. These checks verify the microwave and vent work in harmony.
Sealing And Finishing Touches
Seal around the vent and microwave edges with heat-resistant caulk. This prevents air leaks and keeps the installation tight. Use metal tape on duct joints for extra sealing. Wipe away excess caulk or tape for a neat finish. Reinstall any trim or screws removed during installation. Clean the microwave surface and vent cover to remove dust and fingerprints. These final touches improve appearance and efficiency.
Troubleshooting Common Issues
Troubleshooting common issues during vent installation for an over-the-range microwave helps avoid frustration. Knowing how to fix problems saves time and money. This section covers typical challenges and simple solutions. Follow these tips to ensure your vent works properly and quietly.
Vent Noise Problems
Loud or unusual noises from the vent often mean loose parts. Check screws and brackets to tighten them. A misaligned fan blade can cause rattling sounds. Clean the vent fan and remove debris blocking airflow. Sometimes, the vent motor needs replacement if noise persists.
Poor Ventilation Performance
Weak airflow reduces vent effectiveness. Inspect the duct for clogs or bends that block air. Use a brush or vacuum to clear dust and grease. Ensure the vent size matches the microwave’s requirements for proper airflow. Check that the vent is connected to the outside or recirculates air correctly.
Electrical Connection Errors
Faulty wiring can stop the vent from working. Turn off power before inspecting connections. Look for loose or disconnected wires behind the microwave. Use a voltage tester to confirm power supply. Replace damaged wires and secure all connections tightly. If unsure, consult a professional electrician.
Maintenance Tips
Proper maintenance keeps your over-the-range microwave vent working well. Clean vents help remove smoke and odors efficiently. Regular checks prevent costly repairs and extend your microwave’s life.
Cleaning Vent Filters
Remove vent filters carefully before cleaning. Soak them in warm, soapy water for 10-15 minutes. Use a soft brush to scrub away grease and dirt. Rinse filters well and let them dry completely. Clean filters every month to keep airflow strong.
Inspecting Ductwork
Check ductwork for blockages or damage regularly. Look for holes, loose connections, or debris inside ducts. Clear any obstructions to allow smooth air flow. Repair or replace damaged ducts to avoid leaks. Inspect ducts every 6 months for best results.
Regular Microwave Care
Wipe microwave interior and exterior after each use. Use mild cleaner and soft cloth to avoid scratches. Check the vent fan for unusual noises or vibrations. Replace the fan motor if it sounds weak or noisy. Keep vents clear of nearby objects to ensure proper ventilation.
Frequently Asked Questions
How Do I Vent My Over The Range Microwave?
To vent an over-the-range microwave, connect its vent to existing ductwork leading outdoors. Use a vent kit if no ducts exist. Alternatively, set the microwave to recirculate air with charcoal filters for ductless venting. Always follow manufacturer instructions for proper installation and safety.
Do You Have To Vent An Over The Range Microwave Outside?
You do not have to vent an over-the-range microwave outside. It can recirculate air back into the kitchen. Venting outside improves air quality but is optional. Choose based on your kitchen setup and ventilation needs.
How Much Does It Cost To Install A Microwave Exhaust Vent?
Installing a microwave exhaust vent costs between $100 and $600+. Costs vary by ductwork, electrical needs, and installation complexity. Venting outside offers better performance than recirculating air.
Conclusion
Installing a vent for your over-the-range microwave improves kitchen air quality. It helps remove smoke, steam, and odors while cooking. Follow the steps carefully to ensure proper airflow. Use the right tools and measure accurately before cutting or drilling. Venting to the outside works best, but recirculating options suit some kitchens.
Regular maintenance keeps the vent working well over time. Taking the time to install the vent correctly saves future hassle and keeps your kitchen fresh. Simple effort leads to better cooking comfort every day.