How to Clean a Really Dirty Microwave: Easy Steps for Sparkling Results
Is your microwave looking more like a science experiment than a kitchen helper? If you’ve been avoiding cleaning it because it seems impossible to tackle, you’re not alone.
A really dirty microwave can be frustrating, but you don’t have to live with stubborn stains and lingering smells any longer. Imagine opening your microwave to find it sparkling clean, fresh, and ready to use without any harsh scrubbing or expensive cleaners.
In this guide, you’ll discover simple, effective steps that anyone can follow to transform your grimy microwave into a spotless appliance. Ready to make your microwave shine again? Keep reading, and you’ll learn exactly how to do it quickly and easily.
Credit: www.thekitchn.com
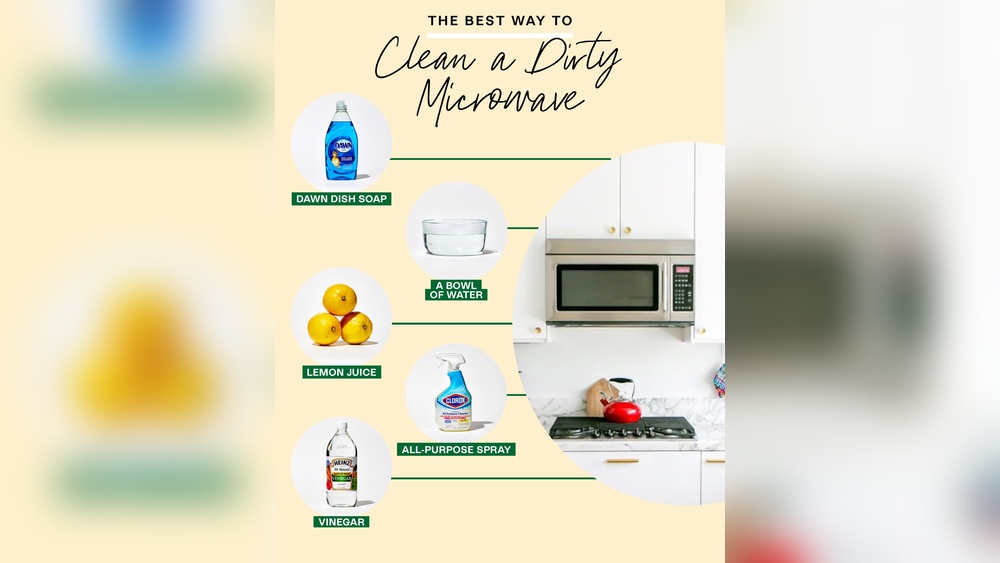
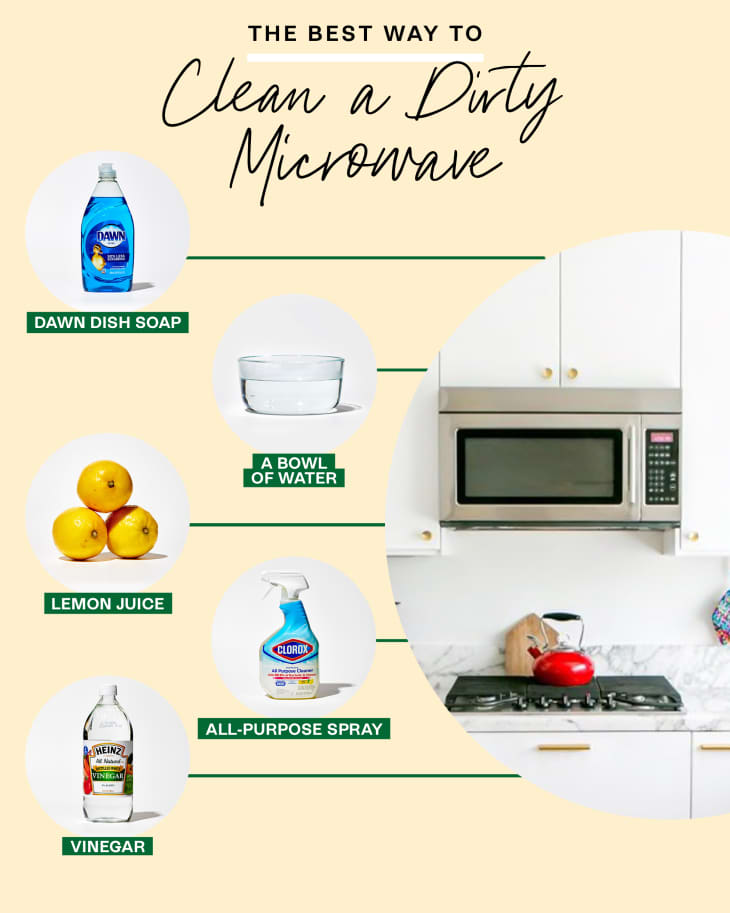
Materials Needed
Gathering the right materials makes cleaning a really dirty microwave easier and faster. Prepare simple items found in most homes. These tools help remove grime and stains without harsh chemicals. Keep everything ready before you start.
Microwave-safe Bowl Or Cup
Choose a microwave-safe container to heat cleaning solutions. Glass or ceramic works best. This bowl holds water and cleaning agents for steam cleaning.
White Vinegar
White vinegar cuts through grease and kills bacteria. It helps loosen stuck-on food and reduces odors. Use it diluted with water for safe cleaning.
Water
Water is essential for steam cleaning and rinsing. Combine it with vinegar or lemon juice. It softens dirt and makes wiping easier.
Lemon Or Lemon Juice
Lemon adds a fresh scent and natural bleach power. It breaks down stains and removes smells. Fresh lemon slices or juice both work well.
Soft Sponge Or Cloth
Use a soft sponge or microfiber cloth to wipe surfaces. Avoid abrasive scrubbers that can scratch the microwave interior. A gentle touch cleans without damage.
Paper Towels Or Dry Cloth
Paper towels or a dry cloth help remove moisture and polish the microwave. They leave the inside dry and streak-free after cleaning.
Unplug For Safety
Unplugging your microwave before cleaning is the safest first step. It stops electricity flow and reduces risks of shocks. A microwave uses high voltage, so safety is critical.
Always remove the plug from the socket before you start cleaning. This simple action protects you from accidental injury. It also prevents damage to the appliance during cleaning.
Why Unplugging Matters
Electricity can cause serious harm if handled carelessly. Wet hands or damp cloths increase the risk of electric shock. Unplugging the microwave cuts off power, making the cleaning process safe.
Even if the microwave is off, it can still hold electrical charge. Unplugging ensures no current flows through its parts while you clean.
How To Safely Unplug Your Microwave
Firmly grip the plug, not the cord, before pulling it out. This prevents damage to the cord and plug. Avoid yanking the cord to unplug it.
Check that your hands are dry before unplugging. This step protects you from electric shock.
After Unplugging: What’s Next?
Once unplugged, you can open the microwave door safely. Remove any loose debris or food particles. Prepare your cleaning tools and solutions.
Cleaning inside a microwave requires care. You avoid accidental starts or electrical hazards after unplugging.
Steam The Interior
Steaming the interior is one of the easiest ways to clean a really dirty microwave. The steam loosens dried food and stains quickly. It softens grime, making it simple to wipe away. This method uses natural ingredients and avoids harsh chemicals. It also helps remove unpleasant odors inside the microwave.
Using Vinegar Or Lemon
Both vinegar and lemon work well for steaming the microwave. Vinegar breaks down grease and kills bacteria. Lemon adds a fresh scent and cuts through grime. Choose either one for a natural cleaning boost. These items are safe and easy to find in most kitchens.
Heating The Water Bowl
Fill a microwave-safe bowl with water. Add two tablespoons of vinegar or half a lemon sliced. Place the bowl inside the microwave. Heat it on high for five minutes. The boiling water creates steam that softens stuck-on food. Let it sit for a few minutes after heating. Use a damp cloth to wipe the interior clean. Repeat if needed for tough stains.
Wipe Down Surfaces
Wiping down the surfaces of a really dirty microwave is a key step in deep cleaning. Dirt, food splatters, and grease build up inside quickly. Cleaning these surfaces properly helps the microwave work better and stay hygienic. Use simple tools like a damp cloth and a gentle cleaner. Avoid harsh scrubbing that might damage the microwave’s interior. Focus on removing grime from all parts, including the turntable and walls.
Removing The Turntable
First, take out the microwave’s turntable. This part collects most spills and crumbs. Carefully lift it out and set it aside. Wash the turntable with warm, soapy water. Use a soft sponge to remove stuck-on food. Rinse well and dry it completely before putting it back. Cleaning the turntable separately makes wiping the microwave easier and more effective.
Cleaning Interior Walls
Next, wipe the interior walls of the microwave. Use a cloth dampened with a mix of water and mild detergent. Gently scrub all sides, paying attention to corners. For tough spots, let the cloth sit for a few minutes to soften dirt. Avoid using metal scrubbers or abrasive pads. After cleaning, wipe again with a clean, damp cloth to remove soap residue. Dry the interior with a soft towel to prevent streaks.
Tackle Tough Stains
Tackling tough stains in your microwave requires a bit of effort and the right methods. Stubborn grime and burnt-on food can make your microwave look old and dirty. These spots need special care to get clean without damaging the surface. The following steps show easy ways to handle these tough stains effectively.
Baking Soda Paste Application
Baking soda works well against tough microwave stains. Make a paste by mixing baking soda with a small amount of water. The paste should be thick enough to stick to the stains.
Apply the paste directly on the stained areas. Let it sit for 10 to 15 minutes. This waiting time helps to break down the grime and loosen the dirt.
After that, use a soft cloth or sponge to scrub the paste gently. Focus on the stained spots but avoid harsh rubbing. Wipe the area clean with a damp cloth to remove all residue.
Spot Cleaning Techniques
For small, stubborn spots, use a damp cloth dipped in vinegar or lemon juice. These natural acids help dissolve grease and food buildup. Dab the stained area and let it sit for a few minutes.
Then, scrub gently with a sponge or soft brush. Avoid using steel wool or rough scrubbers to prevent scratching the microwave’s surface. Rinse the area with a clean, damp cloth and dry it well.
Repeat these steps if needed. This targeted cleaning keeps your microwave looking fresh without harsh chemicals.
Clean The Turntable
Cleaning the microwave turntable is key to a fresh microwave. The turntable collects spills and splatters during cooking. Dirt and food bits can stick hard over time. Removing and cleaning it separately helps keep the microwave hygienic. It also stops bad smells and stains from spreading inside. Follow the simple steps below to clean the turntable properly.
Soapy Water Wash
First, remove the turntable carefully from the microwave. Use warm water and mild dish soap to wash it. A soft sponge or cloth works best to avoid scratches. Scrub gently to remove grease and food residues. Pay attention to edges and corners where dirt hides. Rinse the turntable with clean water to remove soap. This step loosens grime and makes the turntable shine again.
Drying Properly
After washing, dry the turntable well with a clean towel. Moisture left on the surface can cause mold or odors. Let it air dry for a few minutes if needed. Ensure the turntable is fully dry before placing it back inside. This keeps your microwave fresh and ready for use. Proper drying prevents water spots and damage to the microwave’s interior.
Exterior Cleaning
Cleaning the microwave’s exterior keeps it looking fresh and extends its life. Dirt and grease build up on the outside too, especially around buttons and seals. A clean exterior also helps your microwave work properly. Focus on control panels and door seals for best results.
Control Panel Care
Wipe the control panel gently with a soft, damp cloth. Avoid spraying water directly on the buttons. Use a mild soap solution if needed. Dry the panel with a soft cloth to prevent moisture damage. Do not press buttons hard while cleaning. This protects the panel from scratches and malfunctions.
Door Seal Maintenance
Check the door seal for crumbs and spills. Wipe it with a damp cloth to remove dirt. Avoid harsh cleaners that can break down the rubber seal. Keep the seal dry to stop mold and bad smells. Clean the seal regularly to ensure the door closes tightly. A good seal keeps heat inside and saves energy.

Credit: bscappliancerepair.com
Air Drying
Air drying is a simple and effective way to finish cleaning your microwave. After wiping away all the grime, letting the microwave air dry helps remove any leftover moisture. This process prevents bacteria and mold growth inside the microwave. It also avoids streaks or smudges that wet cloths sometimes leave behind.
Allowing your microwave to air dry fully keeps it fresh and ready for use. It takes only a short time but offers great benefits. You do not need any special tools or products for this step. Just a little patience ensures the microwave stays clean and safe.
How To Prepare Your Microwave For Air Drying
First, remove all loose dirt and food particles using a damp cloth. Wipe every surface inside carefully. Open the microwave door wide to let air flow freely. Take out the turntable and dry it separately. This helps speed up drying and prevents trapped moisture.
Best Environment For Air Drying
Choose a warm, dry place to air dry your microwave. Keep the kitchen window open or turn on a fan. Avoid closing the microwave door during this time. Good ventilation reduces moisture faster and keeps odors away. The microwave will dry within 15 to 30 minutes depending on humidity.
Signs Your Microwave Is Fully Dry
Check for any damp spots inside the microwave after air drying. If surfaces feel dry and cool, the process is complete. No water droplets or wet patches should remain. The microwave smells fresh without any damp or musty odors. Now, your microwave is clean and safe for cooking again.
Cleaning Mistakes To Avoid
Cleaning a really dirty microwave requires care. Avoid common mistakes that can damage the appliance or make cleaning harder. Some cleaning methods can harm the microwave’s surface or leave harmful residues. Use safe and gentle techniques for best results.
Harsh Chemicals To Skip
Strong chemicals like bleach, ammonia, and alcohol can ruin the microwave’s interior. They may cause discoloration or damage the plastic parts. These chemicals can also leave harmful fumes inside the microwave. Stick to mild cleaners like vinegar or baking soda instead. They clean well without risk.
Avoiding Abrasive Tools
Scrubbing with steel wool or rough sponges can scratch the microwave surface. These scratches trap dirt and germs, making future cleaning harder. Use soft cloths or non-abrasive sponges for wiping. Gentle tools protect the microwave and keep it looking new longer.
Tips For Maintaining Cleanliness
Keeping your microwave clean is easier than you think. Small daily habits prevent grime buildup. A clean microwave looks good and works better. Follow simple tips to maintain its cleanliness.
Regular Wiping Routine
Wipe the microwave interior after every use. Use a damp cloth or sponge to remove spills. This stops food from drying and sticking. Clean the door, walls, and ceiling carefully. Regular wiping keeps the microwave fresh and hygienic.
Use mild soap if needed. Avoid harsh chemicals that can damage surfaces. Dry the inside with a soft cloth. This prevents moisture and mold growth. A quick wipe saves time and effort later.
Quick Spot Cleaning
Spot clean any splatters immediately. Use a damp paper towel or cloth. Heat a bowl of water with lemon or vinegar inside for 2 minutes. The steam loosens stubborn stains. Wipe away grime easily without scrubbing hard.
Focus on corners and crevices where dirt hides. Quick spot cleaning prevents tough stains. This keeps your microwave looking new longer. Make spot cleaning part of your daily kitchen routine.

Credit: www.youtube.com
Frequently Asked Questions
How Do You Deep Clean A Filthy Microwave?
Steam a bowl of water with lemon or vinegar inside the microwave for 5 minutes. Let it sit, then wipe grime with a cloth. Use baking soda paste on tough spots. Remove and wash the turntable separately. Clean the exterior with soapy water and dry thoroughly.
How To Clean A Badly Burnt Microwave?
Heat a bowl of water with lemon or vinegar inside the microwave for 5 minutes. Let steam loosen burnt grime. Wipe thoroughly with a damp cloth. Use a baking soda paste on tough spots. Clean the turntable separately with soapy water.
Always unplug before cleaning.
What Should You Not Clean A Microwave With?
Avoid abrasive sponges, steel wool, bleach, ammonia, and alcohol to prevent damage to your microwave’s interior surface.
What Is The Microwave Cleaning Hack?
The microwave cleaning hack involves steaming water with lemon or vinegar inside. Let steam loosen grime, then wipe clean easily. Use baking soda paste for tough stains.
Conclusion
Cleaning a really dirty microwave is simple with the right steps. Steam loosens grime quickly and makes wiping easy. Use mild solutions like vinegar or lemon for safe cleaning. Baking soda helps remove tough stains without damage. Clean the turntable separately for the best results.
Regular cleaning keeps your microwave fresh and working well. A little effort saves time and keeps your kitchen healthy. Try these tips and enjoy a sparkling microwave every day.