How to Clean a Filthy Microwave: Easy Steps for a Spotless Shine
Is your microwave looking grimy and smelling less than fresh? You’re not alone.
Over time, splatters and spills build up, turning your microwave into a tough cleaning challenge. But don’t worry—cleaning a filthy microwave doesn’t have to be a dreaded chore. With a few simple tricks and common household items, you can make your microwave look and smell like new again.
Ready to discover how easy it is to restore your microwave’s sparkle? Keep reading, and you’ll learn step-by-step methods that save you time and effort while delivering impressive results. Your kitchen deserves it!
Gather Cleaning Supplies
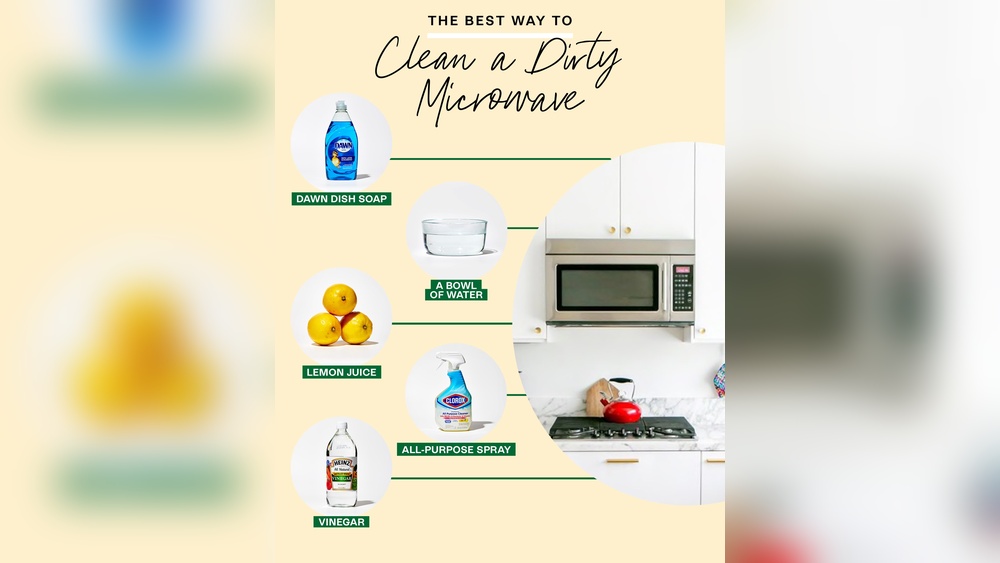
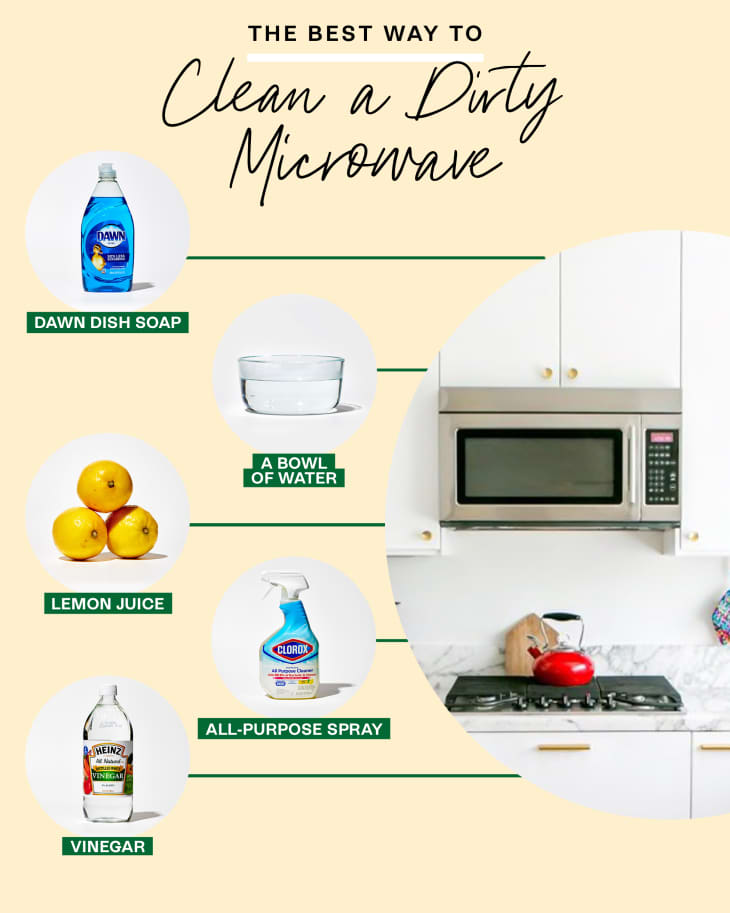
Before you start cleaning a filthy microwave, gather all necessary supplies. Having the right tools and cleaners makes the job easier and faster. Preparation helps you avoid stopping midway to find something.
Essential Tools
Grab a soft sponge or cloth to wipe surfaces without scratching. Use a small bowl or microwave-safe container for heating cleaning solutions. Keep a pair of rubber gloves to protect your hands. A spray bottle helps apply cleaners evenly. Have paper towels or a dry cloth ready for drying. A toothbrush or small brush is useful for scrubbing corners and crevices.
Natural Cleaning Agents
Choose natural cleaners to avoid harsh chemicals in your kitchen. White vinegar works well to cut grease and remove odors. Lemon juice adds a fresh scent and helps break down stains. Baking soda acts as a gentle abrasive to scrub tough spots. Mix these agents with water for safe and effective cleaning solutions. These natural options are safe for your microwave and the environment.

Credit: bscappliancerepair.com
Remove Microwave Components
Removing the microwave components is the first step to deep cleaning. It helps to clean every part thoroughly and avoid damage. Take out pieces carefully and clean them separately for the best results.
Cleaning these parts outside the microwave allows for better access to dirt and grime. It also prevents water from entering the microwave’s electrical parts.
Take Out The Glass Plate
Most microwaves have a glass plate inside that rotates food. Gently lift the glass plate from the microwave base. This plate often collects food splatters and stains.
Wash the glass plate with warm, soapy water. Use a soft sponge to avoid scratches. Rinse well and dry completely before placing it back.
Separate The Turntable
The turntable usually has a plastic or ceramic ring underneath that helps it rotate. Carefully remove this ring and any rollers beneath the glass plate.
Clean the turntable ring and rollers with warm water and mild soap. Dry them fully to prevent rust or mold. This keeps your microwave running smoothly and clean.
Clean The Glass Plate
The glass plate inside the microwave collects food spills and splatters. Cleaning it keeps your microwave hygienic and smelling fresh. Removing the plate makes cleaning easier and more effective. Use simple methods that work fast and leave the glass shining.
Hand Wash Method
Take out the glass plate carefully. Fill your sink with hot water and dish soap. Soak the plate for five to ten minutes. Use a soft sponge to scrub away food stains. Rinse with clean water. Dry the plate with a clean towel before placing it back.
Dishwasher Option
Most glass plates are dishwasher safe. Place the plate on the bottom rack of your dishwasher. Run a normal wash cycle with your usual detergent. Check the plate for any leftover spots. Dry it well before returning it to the microwave.
Tackling Stubborn Grime
For tough stains, soak the plate in hot water mixed with baking soda. Let it sit for 15 to 20 minutes. Use a non-abrasive sponge or cloth to scrub gently. Avoid harsh tools that can scratch the glass. Rinse thoroughly and dry before use.
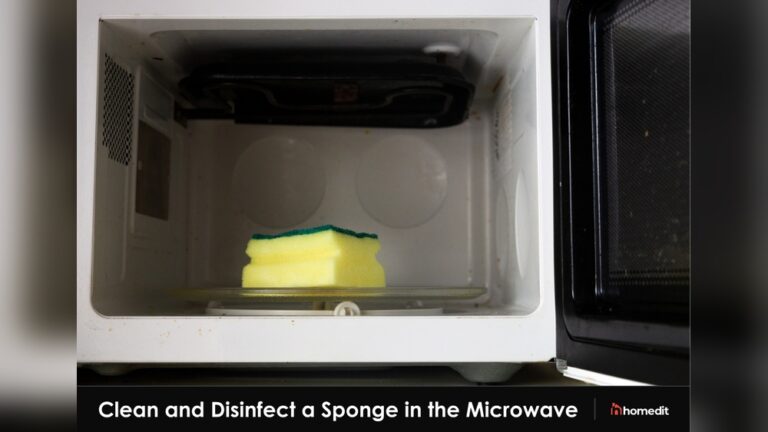
Steam The Microwave Interior
Steaming the inside of your microwave is a simple and effective way to clean it. The steam softens dried food and stains. This makes wiping easier and faster. You don’t need harsh chemicals. Just natural ingredients and heat can do the job well.
Steam also helps remove odors trapped inside. It loosens grease and grime that regular cleaning might miss. This method saves time and effort while keeping your microwave fresh and clean.
Prepare Vinegar Or Lemon Solution
Start by mixing equal parts water and white vinegar in a microwave-safe bowl. Use about one cup of each. Alternatively, squeeze the juice of one lemon into the bowl and add the lemon halves. Both vinegar and lemon help break down dirt and kill germs.
Microwave Heating Time
Place the bowl inside the microwave. Heat it on high for five minutes. The water will boil, creating steam that fills the microwave. Keep the door closed during this time to trap the steam inside. This steam softens the stuck-on food and stains.
Let Steam Loosen Dirt
After heating, leave the bowl inside for another five minutes. The trapped steam keeps working on the dirt. Do not open the microwave door immediately. This waiting period lets the grime loosen, making it easier to wipe away.
Wipe Down Interior Surfaces
Cleaning the inside of your microwave is key to keeping it fresh and safe to use. Wiping down the interior surfaces removes food splatters and grime. This step helps prevent bad smells and stains. Use the right tools and focus on all parts inside for the best results.
Use A Damp Cloth Or Sponge
Start with a soft cloth or sponge slightly dampened with water. Avoid harsh scrubbers that can damage the microwave’s surface. Gently wipe the inside to lift loose dirt and grease. For tough spots, dip the cloth in a mild cleaning solution like diluted vinegar or soap. Rinse the cloth often to keep it clean.
Focus On Walls, Ceiling, And Door
Clean every part inside the microwave. The walls and ceiling catch most of the food splashes. Wipe them carefully to remove all residue. Don’t forget the microwave door, especially the edges and the window. These areas collect grease and crumbs. A clean door helps the microwave seal well and work properly.
Scrub Stubborn Stains
Stubborn stains in your microwave need more than a quick wipe. They cling to the walls and floor, making the microwave look dirty and unhygienic. Scrubbing these stains properly restores cleanliness and keeps your microwave safe for cooking.
Use gentle but effective methods to avoid damaging the microwave’s surface. Focus on breaking down the grime and lifting it away with simple household ingredients and tools.
Apply Baking Soda Paste
Mix baking soda with a little water to create a thick paste. Spread this paste over the stained areas inside the microwave. Let it sit for 10 to 15 minutes. The baking soda softens the grime and makes it easier to scrub off. Use a damp cloth or sponge to wipe away the paste and loosened dirt. Repeat if stains remain stubborn.
Use A Toothbrush For Detail Cleaning
A toothbrush reaches tight corners and crevices where grime hides. Dip the toothbrush in the baking soda paste or mild detergent. Gently scrub around buttons, edges, and the microwave door frame. This careful cleaning removes leftover residue and food particles. Rinse with a damp cloth to finish, leaving the microwave spotless and fresh.
Deodorize The Microwave
After scrubbing away grime and food splatters, your microwave may still hold unwanted smells. Deodorizing the microwave removes these odors and leaves a fresh scent. A clean microwave should not only look good but smell clean too. Using simple methods can help refresh the inside without harsh chemicals. Here are easy ways to deodorize your microwave effectively.
Use Natural Odor Eliminators
Natural ingredients work well to absorb and neutralize smells. Place a bowl filled with water and lemon slices inside the microwave. Heat it for three to five minutes until it steams. The lemon steam breaks down odors and adds a fresh scent.
Another option is a mixture of water and white vinegar. Microwave it for a few minutes to create steam. Vinegar kills bacteria that cause bad smells and clears the air inside. Baking soda also absorbs odors well. Leave an open box or a small bowl of baking soda inside the microwave overnight.
Air Out After Cleaning
After deodorizing, leave the microwave door open for some time. This allows fresh air to circulate inside and carry away trapped smells. Keeping the door open for 30 minutes or more helps dry any moisture and prevent new odors from forming. A well-ventilated kitchen speeds up this process.
Regular airing out after each cleaning keeps your microwave smelling fresh. It also helps avoid mold or mildew growth in hidden spots. Clean and fresh air is the final step to a truly clean microwave.

Credit: www.youtube.com
Clean The Exterior
Cleaning the exterior of your microwave keeps it looking fresh and extends its life. Dirt, grease, and fingerprints build up on the outside over time. Regular cleaning stops grime from settling into buttons and seams. A clean exterior also helps prevent germs from spreading in your kitchen.
Wipe Down The Door And Buttons
Start by spraying a gentle cleaner or a mix of water and vinegar onto a soft cloth. Avoid spraying directly on the microwave to protect electrical parts. Wipe the door surface carefully, focusing on edges and corners. Use a cotton swab or soft brush to clean around buttons and seams. This removes grease and dust that can cause sticky buttons.
Polish With A Soft Cloth
After wiping, use a dry microfiber cloth to polish the surface. This step removes streaks and leaves a shiny finish. Polishing also helps repel fingerprints and smudges. Gently rub the entire exterior until it looks smooth and clean. Your microwave will look almost new and ready for use.
Maintain Microwave Cleanliness
Keeping your microwave clean makes cooking easier and safer. Dirt and food splatters can build up fast. Regular care stops grime from becoming tough stains. A clean microwave also helps avoid smells and germs. Simple daily habits keep it fresh and working well.
Regular Wiping Tips
Wipe your microwave after each use with a damp cloth. Use mild soap if needed to remove food spots. Clean the inside walls, ceiling, and the turntable. Dry the surfaces with a clean towel to prevent streaks. Regular wiping stops buildup and keeps your microwave shiny.
Avoiding Future Build-up
Cover food with a microwave-safe lid or paper towel. This stops splatters and reduces cleaning time. Avoid cooking foods that easily explode, like eggs without shells. Check and clean spills immediately to prevent stains. These small steps save you from tough cleaning later.
Credit: www.thekitchn.com
Frequently Asked Questions
How To Get Brown Stains Out Of The Microwave?
Mix baking soda with water, microwave for two minutes, then scrub stains. Use vinegar to remove stubborn yellow marks. Wipe clean.
How To Clean A Badly Burnt Microwave?
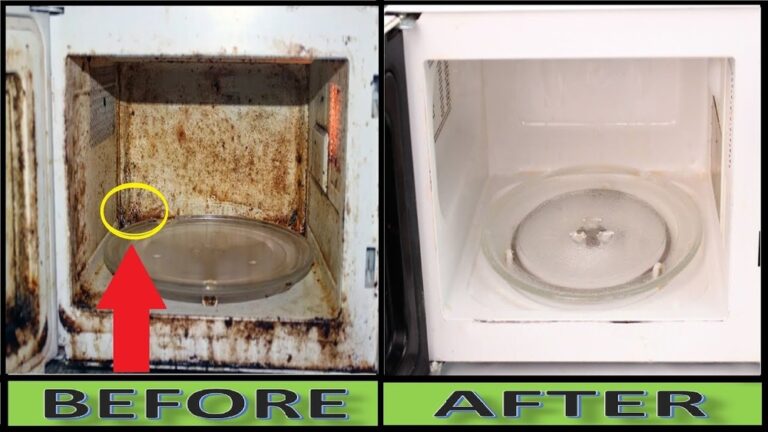
Remove the plate and soak the microwave interior with a water-vinegar mixture. Heat for 5 minutes to loosen burnt residue. Wipe with a sponge, scrub stubborn spots with baking soda paste, then rinse and dry thoroughly. Repeat if needed to eliminate burnt smell and stains.
How To Clean Out A Stinky Microwave?
Place a microwave-safe bowl with water and vinegar or lemon juice inside. Heat for 5 minutes to steam. Wipe the interior with a clean cloth to remove odors and stains. Repeat if necessary.
How To Clean A Glass Microwave Plate?
Remove the glass microwave plate. Wash with hot, soapy water or place in the dishwasher. Soak for tough grime. Use a baking soda paste to scrub stubborn spots gently. Rinse well and dry completely before placing it back.
Conclusion
Cleaning a filthy microwave does not have to be hard. Use simple ingredients like vinegar, baking soda, and lemon. Heat them to create steam that loosens grime and stains. Wipe the inside carefully and clean the glass plate separately. Regular cleaning stops bad smells and keeps your microwave fresh.
A clean microwave looks better and works more efficiently. Try these easy steps today and enjoy a spotless microwave every time.