How to Change Ge Microwave Filter: Quick & Easy Step-by-Step Guide
If you’ve noticed your GE microwave isn’t venting as well as it used to, the filter might be the culprit. Changing your microwave filter is a simple task that can keep your appliance running smoothly and your kitchen smelling fresh.
Whether it’s the grease filter underneath or the charcoal filter hidden behind the vent, knowing how to replace them can save you time and money. In this guide, you’ll learn exactly how to find, remove, and replace your GE microwave filter step-by-step.
Keep reading, and you’ll be able to tackle this easy maintenance job yourself—no technician needed!

Credit: www.youtube.com
Types Of Ge Microwave Filters
GE microwaves use two main types of filters to keep the air clean and the microwave working well. These filters remove smoke, grease, and odors from cooking. Knowing the types helps you replace them correctly and keep your microwave fresh.
The two common filters are the grease filter and the charcoal filter. Each has a special place and job inside your microwave. Understanding their features makes the change process easier.
Grease Filter Location And Features
The grease filter sits at the bottom of the microwave. It is usually under the cooking surface. You can slide it out easily without tools. This filter catches grease and food particles from cooking fumes.
You can clean the grease filter by hand using warm water and soap. It also fits in the dishwasher for a quick wash. Regular cleaning stops grease buildup and keeps air flowing well.
Charcoal Filter Location And Features
The charcoal filter is at the top of the microwave, behind the vent grill. Some models have a grill that you remove by unscrewing. Others use a push-button door above the cooking area for filter access.
This filter removes odors and smoke. It cannot be washed like the grease filter. You must replace it when it becomes full or old. Changing the charcoal filter keeps your kitchen smelling fresh.
Tools Needed For Filter Replacement
Replacing the filter in your GE microwave requires a few basic tools. Having the right tools makes the job easier and faster. Prepare these items before starting the filter replacement.
Flathead Screwdriver
A flathead screwdriver helps remove screws holding the vent grill. Many GE microwave models use flathead screws on the top vent. This tool fits well in tight spaces and allows careful removal without damage.
Phillips Screwdriver
Some models use Phillips screws instead. A Phillips screwdriver has a cross-shaped tip. It provides good grip for unscrewing the vent grill or filter cover. Keep both screwdriver types ready just in case.
Replacement Filter
Get the correct replacement filter for your microwave model. Check the model number to order the right charcoal or grease filter. Installing the exact filter ensures proper microwave function and air cleaning.
Soft Cloth Or Sponge
Use a soft cloth or sponge to clean around the filter area. Wipe away dust and grease before installing the new filter. Clean surfaces help filters fit snugly and improve microwave performance.
Gloves (optional)
Wear gloves to protect your hands from sharp edges inside the microwave. Gloves also keep your hands clean from grease or dirt. They are helpful but not always necessary.
Removing The Grease Filter
Removing the grease filter from your GE microwave is simple and quick. This step is important for keeping your microwave clean and working well. The grease filter catches oil and food particles during cooking. Cleaning or replacing it helps maintain good air flow and prevents bad smells.
Sliding Out The Grease Filter
First, locate the grease filter under the microwave. It usually sits at the bottom, right beneath the cooking area. Look for a small handle or tab on the filter. Gently pull or slide the filter out of its slot. You should feel it move smoothly without much force. If it feels stuck, try wiggling it slightly while pulling. Avoid using tools to prevent damage.
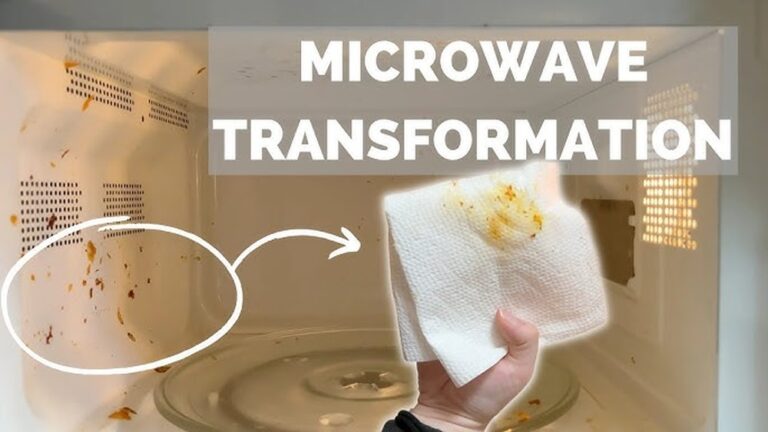
Cleaning The Grease Filter
After removing the filter, clean it with warm water and mild soap. Use a soft brush or sponge to remove grease and dirt. Rinse the filter well to remove all soap. Let it dry completely before putting it back. You can also put some filters in the dishwasher if the manual allows. Regular cleaning keeps the filter effective and your microwave fresh.
Replacing The Charcoal Filter
Replacing the charcoal filter in your GE microwave is key for clean air and proper ventilation. The charcoal filter traps odors and smoke during cooking. Over time, it gets clogged and loses effectiveness. Changing it keeps your microwave working well and your kitchen smelling fresh.
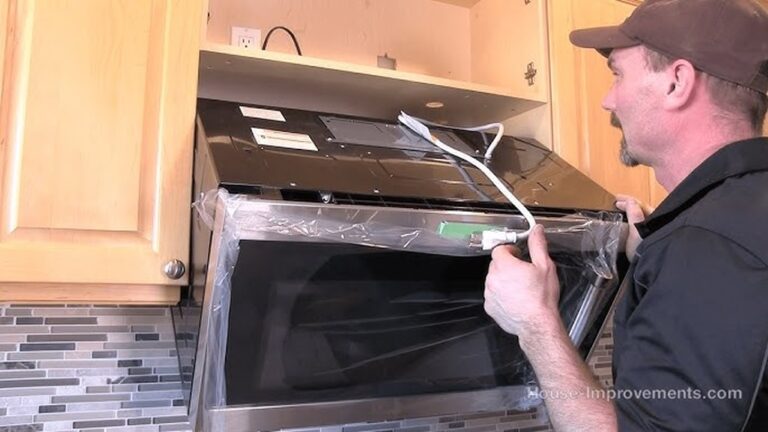
Removing The Vent Grill
First, unplug the microwave for safety. Locate the screws on the top vent grill. Use a screwdriver to remove all screws. Gently pull the vent grill away from the microwave. Set the grill and screws aside carefully.
Accessing The Filter Door
With the vent grill removed, find the charcoal filter door. It usually sits behind the vent area. Some models have a simple push-button to open the filter door. Press the button or pull the door open slowly to access the filter compartment.
Removing The Old Charcoal Filter
Take out the old charcoal filter from the compartment. It might be held by clips or a frame. Carefully release the filter without breaking it. Dispose of the old filter according to local guidelines. Avoid touching the filter surface to keep hands clean.
Installing The New Charcoal Filter
Place the new charcoal filter into the compartment. Align it with clips or slots for a secure fit. Close the filter door firmly until it clicks. Reattach the vent grill by lining it up and screwing it back in place. Plug the microwave back in and test the ventilation.
Microwave Models With Push-button Filter Doors
Some GE microwave models come with push-button filter doors. These doors make filter replacement easier. You do not need any tools to open them. The push-button system gives quick access to the charcoal filter. This design helps keep your microwave clean and working well. It saves time and effort during maintenance.
Opening The Filter Door
First, open the microwave door fully. Look above the cooking cavity for a small panel marked “PUSH.” Press this panel gently. The filter door will lower or pop open. This reveals the charcoal filter inside. No screws or tools are needed. If the door does not open, check for any locks or catches. Always unplug the microwave before starting.
Replacing The Charcoal Filter Without Tools
Once the filter door is open, slide the old charcoal filter out carefully. The filter usually fits snugly but comes out easily. Take your new filter and slide it into the same slot. Make sure it fits securely. Close the filter door by pushing it back up until it clicks. You are done. This simple process keeps your microwave smelling fresh and working well.

Credit: www.amazon.com
Cleaning Vs Replacing Filters
Filters in your GE microwave keep air clean and grease-free. Knowing when to clean or replace these filters helps your microwave work well. Both grease and charcoal filters need care, but the steps differ. Understanding their roles and maintenance keeps your microwave fresh and efficient.
When To Clean The Grease Filter
The grease filter traps oil and food particles. It is usually located under the microwave. Remove it by sliding it out carefully. Clean it every one to three months to prevent buildup.
Use warm water and mild soap for hand washing. You can also place it in the dishwasher. Let it dry completely before putting it back. A clean grease filter improves airflow and stops odors.
When To Replace The Charcoal Filter
The charcoal filter removes smoke and smells. It sits behind the top vent grill of the microwave. This filter cannot be washed like the grease filter.
Replace it every six months or sooner if smells persist. Unplug the microwave and remove the vent grill screws. Take out the old filter and install a new one in its place. Regular replacement keeps air fresh and the microwave safe.
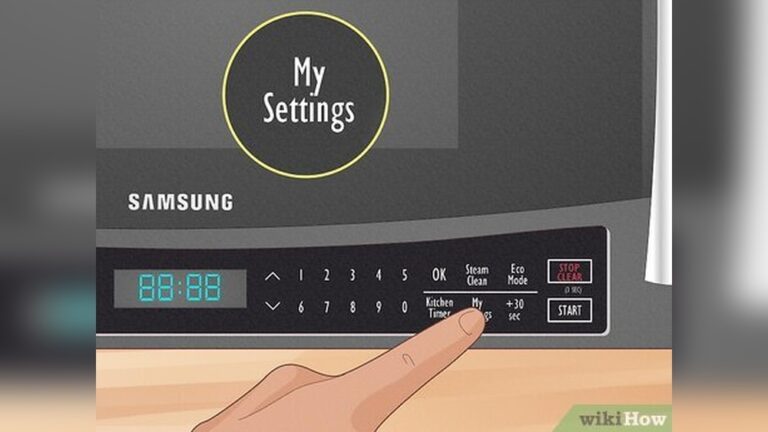
Resetting The Filter Indicator
Resetting the filter indicator on your GE microwave is a key step after changing the filter. This indicator helps you track when the filter needs replacement. Without resetting, the microwave may keep showing a reminder even after installing a new filter. The reset process is simple and can be done using the microwave’s control panel or a dedicated button.
Using The Control Panel
Start by making sure the microwave is plugged in and the door is closed. Locate the control panel on the front of the microwave. Look for a button or setting labeled “Filter Reset” or “Reset.” Press and hold this button for about 3 to 5 seconds. You should see the filter light turn off or the display change, confirming the reset. This method works for most GE microwave models and requires no tools.
Filter Reset Button Steps
Some GE microwaves have a specific filter reset button separate from the control panel. Open the microwave door and find this button near the filter area or on the keypad. Press and hold the filter reset button until the filter light goes off. This usually takes a few seconds. Release the button and close the door. The microwave will now stop showing the filter replacement alert until the next cycle.

Credit: www.youtube.com
Tips For Maintaining Microwave Filters
Maintaining your GE microwave filters helps keep your microwave working well. Clean and check filters often. This prevents smoke and odors from building up. Filters also protect the microwave’s parts from grease and dust. Good care means your microwave lasts longer and cooks better.
Regular Cleaning Schedule
Set a routine to clean your microwave filters every month. Remove the grease filter and wash it with warm soapy water. Let it dry completely before putting it back. The charcoal filter cannot be washed. Instead, replace it every 6 months or as the manual says. Regular cleaning stops grease and dirt from blocking air flow.
Signs Of Filter Wear And Tear
Look for dark spots or holes in the grease filter. These signs mean the filter is old and should be replaced. The charcoal filter loses its smell-absorbing power over time. If cooking smells stay in your kitchen, replace the charcoal filter. Damaged or clogged filters reduce microwave performance and may cause overheating.
Frequently Asked Questions
Where Is The Filter On My Ge Microwave?
The GE microwave has a grease filter under the cooking surface that slides out. The charcoal filter sits behind the top vent grill, which may require unscrewing to access.
Is It Hard To Replace A Ge Microwave Filter?
You can clean the grease filter with warm, soapy water or in the dishwasher. Charcoal filters require replacement for best results.
Can I Clean My Ge Microwave Filter Instead Of Replacing It?
Unplug the GE microwave first. Slide out the grease filter from the bottom and wash with warm, soapy water. Remove the vent grill screws to access the charcoal filter. Replace or clean the charcoal filter as needed. Reset the filter indicator by pressing the reset button on your model.
Conclusion
Changing your GE microwave filter keeps the appliance working well. Clean or replace filters regularly to avoid odors and smoke. The grease filter slides out easily for washing. The charcoal filter needs the vent grill removed or a push-button opened.
Always unplug the microwave before starting. Follow these simple steps to save time and effort. A fresh filter helps your microwave stay safe and efficient. Regular maintenance extends the life of your microwave. Simple care makes a big difference in kitchen safety and air quality.