How Do You Clean a Sponge in the Microwave: Easy & Effective Tips
Your kitchen sponge works hard every day, scrubbing away grease and grime. But have you ever stopped to think about how clean your sponge really is?
If you’re like most people, the answer is probably no. Sponges can harbor a surprising amount of bacteria, and using a dirty one might actually be spreading germs instead of cleaning them. Fortunately, there’s a quick and easy way to sanitize your sponge using something you already have in your kitchen: your microwave.
Want to know exactly how to do it safely and effectively? Keep reading, because we’re about to show you the simple steps that will keep your sponge fresh and your kitchen healthier.
Prep The Sponge
Preparing your sponge correctly is crucial before microwaving it. Proper prep helps sanitize the sponge safely and effectively. Follow these steps to get your sponge ready for microwave cleaning.
Remove Debris
First, check the sponge for any leftover food or debris. Rinse it under running water to clear away dirt. Removing debris prevents bad smells and ensures better cleaning results.
Soak Thoroughly
Next, soak the sponge fully in water. A wet sponge creates steam inside the microwave. This steam kills germs and bacteria effectively. Make sure the sponge is wet, not dry, before microwaving.
Check For Metal Parts
Look closely for any metal pieces or scrubbing pads with metal. Metal in the microwave can cause sparks and damage the appliance. Remove or replace sponges with metal before microwaving.
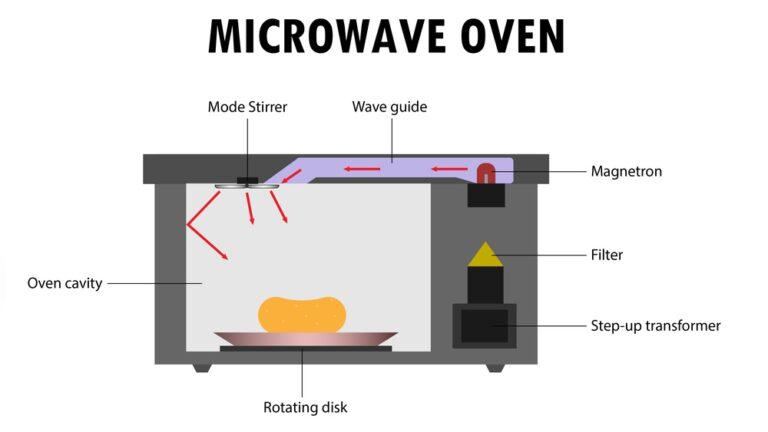
Credit: www.allplanttraining.co.uk
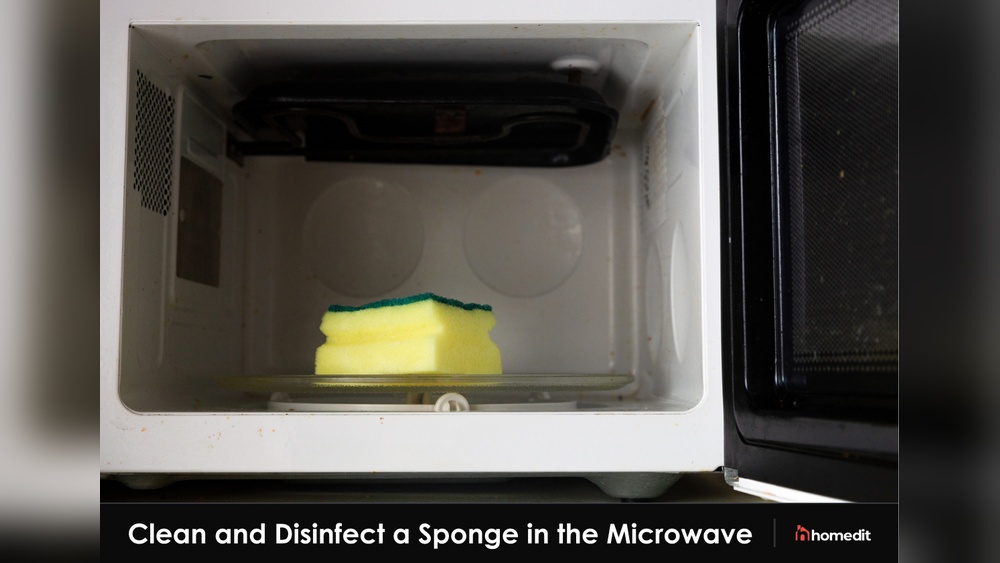
Microwave Sanitizing
Cleaning a sponge in the microwave kills bacteria quickly. The heat and steam work together to sanitize it well. This method is simple and saves time compared to other cleaning ways.
Always wet the sponge before microwaving. The moisture creates steam, which helps remove germs effectively. Dry sponges can catch fire or get damaged.
Set Microwave Time
Place the wet sponge in the microwave. Set the timer for one to two minutes on high power. This time is enough to kill most bacteria and germs.
Do not microwave longer than two minutes. Overheating can damage the sponge or start a fire. Stay nearby to watch the process.
Use Microwave-safe Dish
Put the sponge on a microwave-safe plate or bowl. This protects the microwave and helps catch any drips. Avoid placing the sponge directly on the microwave floor.
A microwave-safe dish also keeps the sponge stable. It makes removing the hot sponge safer and easier.
Avoid Overheating Risks
Never microwave a dry sponge. It can catch fire or spark. Always soak the sponge with water first.
Check the sponge for metal parts or scrubbing pads. Metal can cause sparks and damage your microwave. Use only sponges without metal.
After microwaving, use tongs or oven mitts to remove the sponge. It will be very hot and can burn your hands.
Safe Removal
Removing a sponge from the microwave requires care. The sponge gets very hot and can burn your skin. Follow safe steps to handle it properly and avoid accidents.
Use Tongs Or Mitts
Never use bare hands to take the sponge out. Use kitchen tongs or oven mitts to grip the sponge firmly. This keeps your hands safe from heat and steam. Hold it carefully to avoid dropping it.
Allow Sponge To Cool
After removal, place the sponge on a heat-safe surface. Let it cool for several minutes before touching it with bare hands. Cooling prevents burns and lets the sponge dry slightly. Handle only when it feels safe to touch.
Post-cleaning Care
After sanitizing your sponge in the microwave, proper care keeps it clean longer. Post-cleaning care helps maintain the sponge’s freshness and prevents new bacteria growth. Follow these simple steps to extend the life of your sponge and keep your kitchen safe.
Squeeze Excess Water
After microwaving, the sponge will be very wet. Gently squeeze out as much water as possible. Avoid twisting too hard to prevent damage. Removing excess water stops bacteria from growing quickly.
Air Dry Sponge
Place the sponge in a clean, dry area to air dry. Avoid leaving it in a damp sink or closed container. Letting it dry completely helps kill remaining germs and keeps the sponge fresh.
Frequency Of Cleaning
Clean your sponge in the microwave daily or every other day. Frequent cleaning reduces bacteria buildup and odors. Replace the sponge every one to two weeks or when it starts to break down.
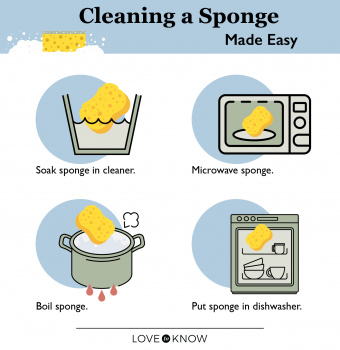
Alternative Cleaning Methods
Microwaving is a popular way to clean sponges. Some people prefer other methods for variety or safety reasons. Alternative cleaning methods can be just as effective. These methods help remove germs and keep your sponge fresh. Here are some common options to try.
Dishwasher Cleaning
Place the sponge in the dishwasher’s top rack. Use a hot water cycle with detergent. The heat and soap kill most bacteria. This method is easy and uses tools you already have. It also dries the sponge, reducing bacteria growth.
Bleach Soaking
Mix one part bleach with nine parts water in a bowl. Soak the sponge for five minutes in this solution. Rinse the sponge well with clean water afterward. Bleach kills germs quickly and deeply. Use this method once a week for best results.
Other Sanitizing Tips
Boil the sponge in water for five minutes to kill bacteria. Use vinegar as a natural cleaner by soaking the sponge for 10 minutes. Always rinse your sponge after cleaning to remove any residue. Store the sponge in a dry place to prevent bacteria growth.

Credit: www.construction-manent.fr
Health Considerations
Cleaning a sponge in the microwave can help reduce germs. Still, it is important to think about health risks. Sponges often hold many bacteria. Proper care keeps your kitchen safe and clean. Here are key health points to know before microwaving your sponge.
Bacteria Risks
Sponges trap food particles and moisture. This creates a perfect place for bacteria to grow. Some bacteria can cause illness or food poisoning. Microwaving a wet sponge kills many germs. But it does not remove all bacteria or dirt. Regular cleaning and sponge replacement are necessary.
Signs To Replace Sponge
Sponges do not last forever. Throw away your sponge if it smells bad. Also, replace it if it breaks apart or changes color. A worn sponge does not clean well. It can spread bacteria instead of removing it. Changing sponges often keeps your kitchen healthier.
Avoiding Cross-contamination
Use separate sponges for different tasks. For example, one for dishes and one for counters. This stops germs from spreading between surfaces. Always wash your hands after handling dirty sponges. Store sponges where they can dry quickly. A dry sponge holds fewer bacteria than a wet one.

Credit: www.youtube.com
Frequently Asked Questions
How Do I Sanitize A Sponge In The Microwave?
Wet the sponge thoroughly and ensure no metal parts. Microwave on high for 1-2 minutes. Use tongs to remove, let cool, then squeeze out water.
How Long Do You Put A Wet Sponge In The Microwave To Clean It?
Place a thoroughly wet sponge in the microwave on high for 1 to 2 minutes. Use tongs to remove it carefully. Let it cool before squeezing out excess water and using. Repeat daily for best results.
How To Clean Dirty Dish Sponges?
Wet the sponge thoroughly, then microwave it on high for 1-2 minutes to kill bacteria. Let it cool before use. Alternatively, soak in diluted bleach for one minute, rinse, and air dry. Replace sponges every 1-2 weeks or when worn.
Conclusion
Cleaning a sponge in the microwave is quick and effective. Always wet the sponge well before microwaving. Heat it for one to two minutes to kill germs. Use tongs to remove it carefully, as it will be hot. Let the sponge cool and squeeze out extra water.
Regular cleaning helps keep your kitchen safe and fresh. Replace your sponge every one to two weeks for best results. Simple steps make a big difference in hygiene. Try this easy method to keep sponges clean and healthy.