How to Remove an Over Range Microwave: Simple Step-by-Step Guide
Thinking about removing your over-the-range microwave but not sure where to start? You’re not alone.
Many homeowners hesitate because it seems complicated or risky. But with the right steps, you can safely take down your microwave without calling in a pro. In this guide, you’ll discover simple, clear instructions that walk you through the entire process.
By the end, you’ll have the confidence to remove your microwave smoothly and get ready for a new one or a fresh kitchen look. Let’s make this task easier than you ever expected. Keep reading to find out how!

Credit: www.youtube.com
Tools And Safety
Removing an over range microwave requires the right tools and careful attention to safety. Preparing properly helps the process go smoothly and prevents accidents. Use tools that fit the job and follow safety steps closely.
Essential Tools
Gather these tools before starting the removal:
- Screwdriver set (Phillips and flathead)
- Drill with screwdriver bits
- Socket wrench or nut driver
- Stud finder to locate wall studs
- Step ladder for reaching high places
- Flashlight for better visibility
- Work gloves to protect your hands
- Helper to support the microwave during removal
These tools help you remove screws, bolts, and hold the microwave safely.
Safety Precautions
Turn off power to the microwave at the circuit breaker before starting.
Unplug the microwave to avoid electric shock.
Wear gloves to protect your hands from sharp edges.
Use a sturdy ladder to reach the microwave comfortably.
Ask someone to help hold the microwave while you remove it.
Clear the area below to prevent tripping or damage if the microwave falls.
Take your time. Rushing can cause mistakes or injury.
Preparing The Microwave
Start by unplugging the microwave and clearing the area below it. Open the cabinet above to access mounting screws. Support the microwave’s front as you remove bolts to prevent it from falling.
Preparing your over range microwave for removal is key for safety and ease. Take time to get everything ready before starting the actual removal process. This helps avoid damage and prevents accidents.
Two main steps are essential: unplugging the unit and clearing the area around it. These steps ensure you have a safe and clear workspace.
Unplugging The Unit
First, find the microwave’s power source. It is usually plugged into an outlet above the stove or inside a cabinet nearby.
Pull the plug carefully from the socket. Avoid yanking the cord to prevent damage. If the outlet is hard to reach, use a small step stool.
Unplugging stops electricity from flowing and lowers the risk of electric shock. Never skip this step.
Clearing The Area
Remove items from the stove and countertop near the microwave. Clear pots, pans, and any kitchen tools that may get in the way.
Make space to move freely. A clean area helps you work faster and safer. It also reduces the chance of dropping or breaking anything.
Keep a sturdy ladder or step stool nearby if the microwave is high up. This gives you better control during removal.
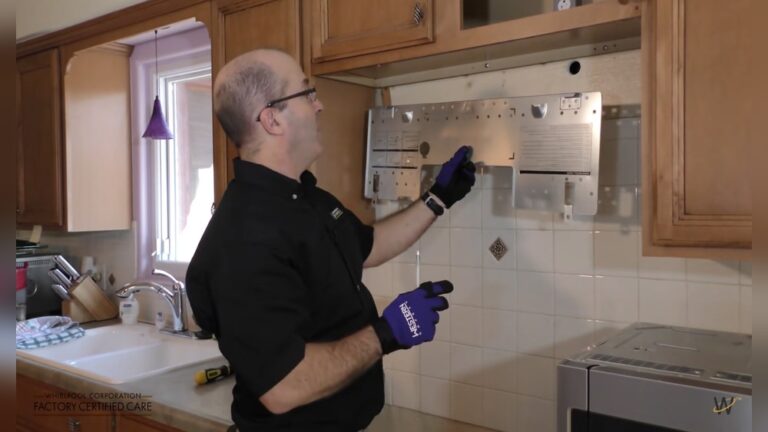
Accessing Mounting Hardware
Accessing the mounting hardware is the first step in removing an over range microwave. It involves opening the cabinet above the microwave and locating the bolts that hold the unit in place. These bolts secure the microwave to the cabinet and wall bracket. You need clear access to them before you can safely remove the microwave. Taking your time here helps avoid damage to the cabinet or microwave.
Opening The Cabinet Above
Start by opening the cabinet directly above the microwave. This cabinet often hides the mounting bolts. Remove any items stored inside to give yourself room to work. Use a flashlight if the space is dark. Check for a cabinet floor panel that may need to be removed or loosened. This panel often covers the bolts securing the microwave. Gently pry or unscrew it to gain access. Be careful not to damage the cabinet surface.
Locating Mounting Bolts
With the cabinet opened, look for the large mounting bolts at the front edge. These bolts pass through the cabinet floor and hold the microwave firmly. Usually, there are three or more bolts. You may also find screws or brackets securing the microwave to the wall. Identify all fasteners before starting removal. Use the correct screwdriver or socket wrench to avoid stripping the bolts. Once all bolts are accessible, you can begin loosening them to free the microwave.
Removing Mounting Bolts
Removing the mounting bolts is a key step in taking down an over range microwave. These bolts hold the microwave firmly in place. You must remove them carefully to avoid damage. Proper removal ensures the microwave detaches smoothly from the wall and cabinet.
Before you start, make sure the microwave is supported or held by another person. This prevents it from falling once the bolts are loose. Use the right tools for the bolts to make the job easier and safer.
Types Of Bolts To Remove
Over range microwaves usually have two types of mounting bolts. The first type is the bolts attaching the microwave to the cabinet above. These bolts are often long and go through the cabinet floor into the microwave frame.
The second type is the bolts or screws securing the microwave to the wall bracket. These are usually smaller and hold the back of the microwave in place. Both types must be removed to free the microwave completely.
Tips For Stubborn Bolts
Some bolts may be tight or stuck due to rust or old age. Use a penetrating oil to loosen rusted bolts. Spray the oil and wait about 10 minutes before trying again.
Use a proper screwdriver or socket wrench that fits the bolt head perfectly. This prevents stripping the bolt and makes removal easier. If a bolt is very stubborn, gently tap the handle of the tool with a hammer to break it free.
Keep steady pressure and turn slowly. Rushing or forcing the bolt can cause damage to the microwave or wall. Take your time and remove each bolt carefully.
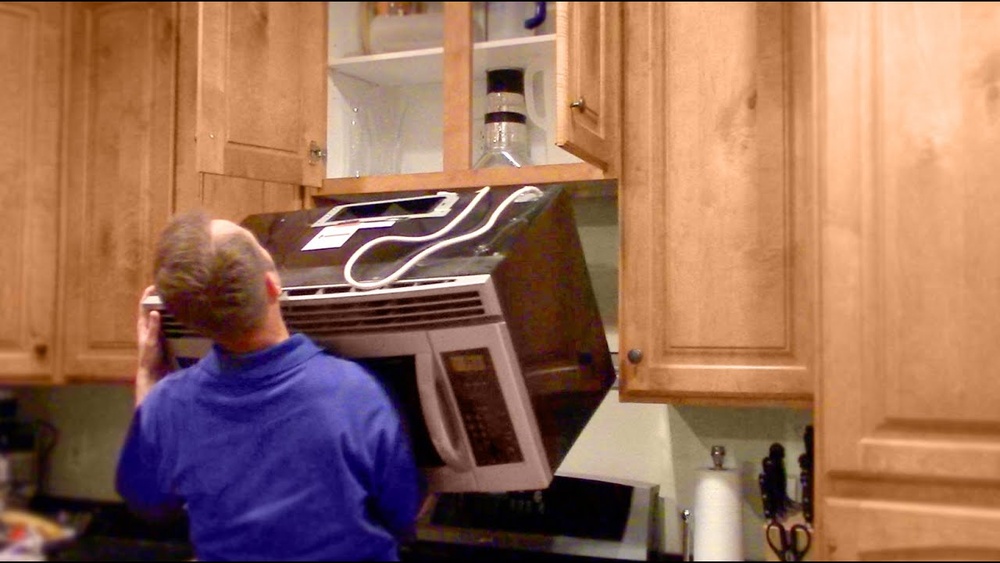
Detaching The Microwave
Detaching an over range microwave is a careful process. It involves supporting the microwave and unhooking it from the wall bracket. This step requires attention to safety and proper handling. Follow these steps to remove the microwave without damage or injury.
Supporting The Microwave
Start by placing a sturdy support under the microwave. Use a step stool or a strong box to hold its weight. This prevents the microwave from falling once you loosen the bolts. Keep your hands ready to steady the microwave while you work.
Leaning And Unhooking From Wall Bracket
After supporting the microwave, remove the bolts securing it to the cabinet. Usually, there are three large bolts near the front edge. Carefully lean the microwave forward to access the power cord. Unplug the microwave from the outlet behind it.
Next, lift the back of the microwave off the wall bracket tabs. The microwave should come free with a gentle pull. Move the microwave away from the wall slowly and set it down safely.

Credit: www.wikihow.com
Disconnecting Electrical And Vent Connections
Disconnecting electrical and vent connections is a key step in removing an over range microwave. This step ensures safety and prevents damage to your kitchen appliances. Always turn off power before starting any disconnection. Take your time and handle each connection carefully.
Unplugging Power Cord
Locate the power cord behind the microwave. Gently pull it out from the outlet. Avoid yanking the cord to prevent damage. If the cord is hard to reach, use a flashlight to see clearly. Make sure no electricity flows to the microwave before moving forward.
Handling Vent Ducts
Identify the vent ducts connected to the microwave. These ducts allow air to flow outside or through filters. Carefully detach the vent clamps or screws holding the ducts. Support the ducts to avoid bending or breaking them. Keep the ducts safe if you plan to reuse them later.
Removing The Microwave
Removing an over range microwave requires careful steps to avoid damage. Start by preparing your workspace and gathering tools. Ensure the microwave is unplugged for safety. Support the microwave before detaching it from the wall. This section explains how to lift off the wall plate and use safe removal methods. Follow these tips to remove the microwave smoothly and safely.
Lifting Off The Wall Plate
First, locate the mounting bracket holding the microwave. This bracket is usually fixed to the wall studs. Support the microwave from the bottom to prevent it from falling. Remove the screws or bolts securing the microwave to the bracket. Slowly tilt the microwave forward to release the back from the wall plate. Lift the microwave straight up to clear the bracket. Set the microwave down gently on a sturdy surface.
Safe Removal Techniques
Wear gloves to protect your hands during removal. Use a helper to support the microwave’s weight. Avoid pulling the microwave away forcefully. Keep the power cord unplugged to prevent electric shock. Clear the area around the microwave for easy movement. Use a step ladder if the microwave is mounted high. Handle the microwave carefully to avoid dents or scratches. Dispose of or store the microwave properly after removal.
Post-removal Steps
After removing an over range microwave, several important steps follow. These post-removal actions prepare your kitchen for a new appliance or other updates. Proper care ensures the wall and cabinets stay in good shape. Clean the space thoroughly for safety and aesthetics.
Inspecting Wall And Cabinet
Check the wall behind the microwave for damage. Look for holes, cracks, or stains. The cabinet above may have screw holes or marks. Ensure the mounting bracket is intact if you plan to reuse it. Repair any damage with filler or paint. This prevents future issues and keeps the kitchen neat.
Cleaning The Area
Remove dust, grease, and debris left from the microwave. Use a mild cleaner safe for your wall and cabinet surfaces. Wipe the area gently to avoid damage. Clean inside the cabinet above as well. This step improves air quality and prepares the spot for a new microwave.
Preparing For New Installation
Preparing for the new installation is a key step after removing an over range microwave. This phase ensures the replacement microwave fits perfectly and functions safely. Take time to examine the mounting area and plan where the new unit will go. Careful preparation saves effort and avoids damage.
Checking Mounting Bracket Condition
Inspect the existing mounting bracket carefully. Look for rust, bends, or cracks that may weaken support. A damaged bracket must be replaced to hold the new microwave securely. Check if the bracket matches the new microwave’s size and weight. Tighten loose screws or replace missing parts. Proper bracket condition is essential for safety and stability.
Planning Placement
Measure the space above your stove to confirm it fits the new microwave. Note the height and depth to avoid blocking cabinets or vents. Consider the microwave’s venting system and power cord location. Plan the placement to allow easy access to controls and proper airflow. Clear any obstacles or items around the installation area. Good planning ensures a smooth, trouble-free setup.

Credit: www.wikihow.com
Frequently Asked Questions
How To Detach An Over-the-range Microwave?
Open the cabinet above the microwave. Support its front, remove the three front bolts. Lean microwave forward, unplug it, lift back off wall tabs, then remove.
What Holds An Over-the-range Microwave In Place?
An over-the-range microwave stays in place using a mounting bracket attached to wall studs. Screws secure it to the cabinet above. This ensures stable support above the stovetop.
How To Get A Microwave Off The Bracket?
Unplug the microwave first. Support its front, then remove mounting bolts under the cabinet. Tilt forward, lift off the wall bracket, and pull the microwave free.
Conclusion
Removing an over range microwave is simple with careful steps. Always turn off the power before starting. Support the microwave’s weight while unscrewing bolts. Gently lift and unplug the unit from the wall bracket. Take your time to avoid damage to cabinets or walls.
Following these tips helps keep your kitchen safe. Now, you can replace or clean your microwave easily. This guide makes the process clear and stress-free.