How to Set Time on Ge Microwave: Quick & Easy Steps Guide

Setting the time on your GE microwave might seem like a small task, but it’s essential for keeping your kitchen running smoothly. Whether you’re trying to time your meals perfectly or just want the clock to display the correct time, knowing how to set your microwave’s clock is a simple skill that saves you frustration.
In this guide, you’ll find clear, step-by-step instructions tailored specifically for your GE microwave. No confusing jargon or complicated steps—just easy directions that anyone can follow. Keep reading to master this quick fix and take full control of your microwave’s settings today!

Credit: www.youtube.com
Locate Clock Button
Find the clock button on your GE microwave’s control panel. Press it once to start setting the time. Enter the correct time using the number keys, then press the clock button again to save.
Locate Clock Button On Ge Microwave
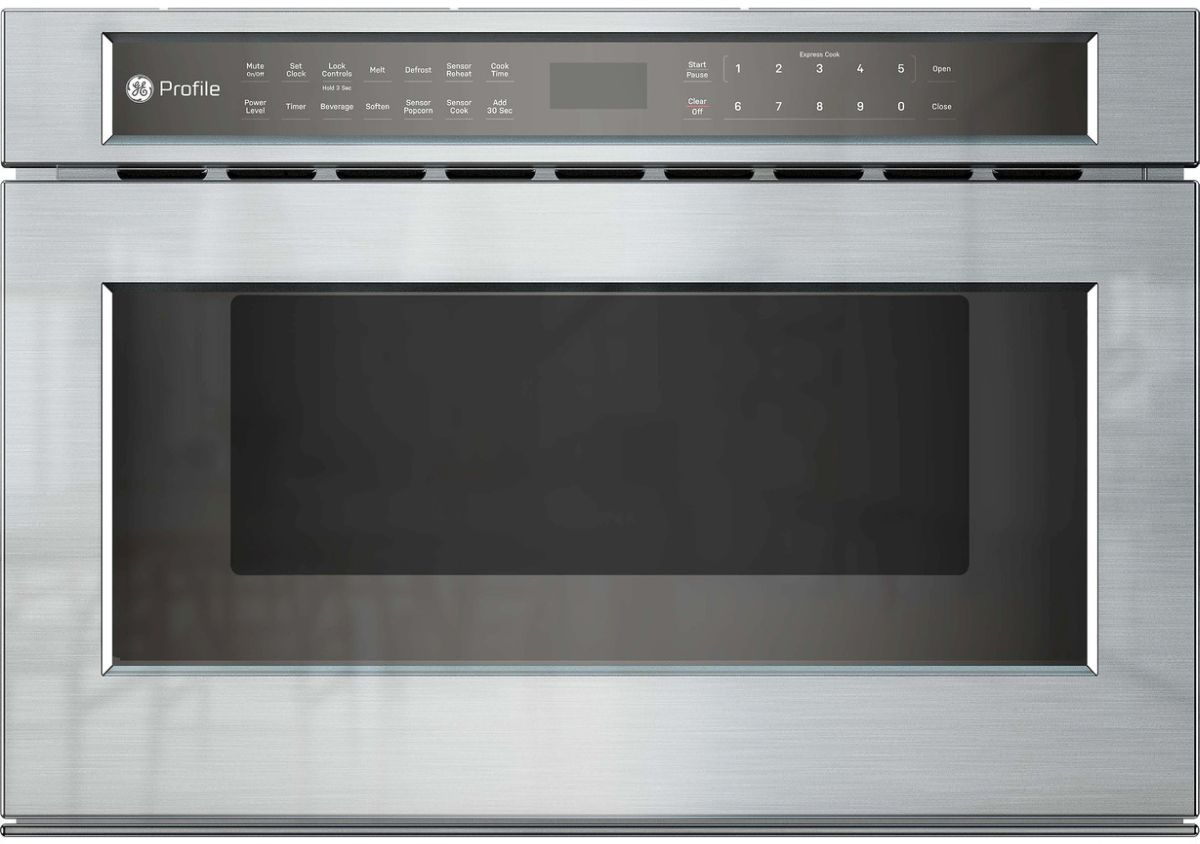
Finding the clock button on your GE microwave is the first step. This button allows you to set the correct time. It usually says “Clock” or “Clock/Timer”.
Look closely at the microwave control panel. The button is often near the number pad or timer controls. It may be a small button, so check carefully.
Some models require pressing the button once. Others need a longer press or pressing it twice. The clock button helps start the time-setting process.
Common Places To Find The Clock Button
On many GE microwaves, the clock button is near the bottom or center of the panel. It may be grouped with other timer or kitchen timer buttons. Check the edges of the control panel too.
If the microwave has a touchscreen, the clock setting may appear after pressing a “Settings” or “Menu” icon. Look for clock or time options in that menu.
What To Do If You Can’t Find The Clock Button
Check the microwave’s user manual for exact button location. The manual often shows a picture of the control panel. It helps you spot the clock button quickly.
Try pressing buttons labeled “Timer” or “Settings”. Sometimes the clock function is combined with these buttons. Watch the display for any clock symbols or blinking numbers.
Credit: www.reckerandboergerhomeappliance.com
Enter Current Time
Setting the correct time on your GE microwave is simple. The first step is to enter the current time. This allows the microwave clock to display the right hour and minute. A properly set clock helps you use the timer and cooking features accurately.
Entering the current time involves a few easy steps. The microwave control panel has buttons designed for this purpose. Following these steps ensures the microwave shows the exact time you want.
Press The Clock Button
Look for the button labeled “Clock” on the control panel. Press it once to start setting the time. The clock display will usually start blinking, showing it is ready for input.
Input The Current Time
Use the number pad to enter the current time. For example, for 3:45, press 3, then 4, then 5. Make sure to use the 12-hour format as shown on the microwave screen.
Confirm And Save The Time
Press the “Clock” button again or the “Enter” button to save the time. The blinking colon on the display will stop. This confirms that the new time is now set and showing correctly.
Save Clock Setting
Saving the clock setting on your GE microwave keeps the correct time visible at all times. This feature helps you track cooking times and plan your kitchen activities better. The microwave remembers the time even after power outages once you save the setting.
Setting and saving the clock is simple and fast. You do not need any special tools or technical knowledge. Just follow a few easy steps to keep your microwave clock accurate.
Locate The Clock Button
Find the button labeled “Clock” on your microwave’s control panel. It may also say “Clock/Timer” or just “Timer” on some models. Press this button once to start setting the time.
Enter The Current Time
Use the number pad to type in the current time. Enter the hours first, then the minutes. Make sure you use the 12-hour or 24-hour format as your microwave supports.
Save The Clock Setting
Press the “Clock” button again or the “Enter” button to save the time. The clock display will stop blinking, showing the new time is set. Your microwave will now keep this time until you change it again.
Hold Clock Button Method
The Hold Clock Button Method offers a simple way to set the time on your GE microwave. This method involves pressing and holding the clock button until the display changes. It works on most GE microwave models and requires only a few steps.
This approach is useful when a quick time setting is needed. It avoids multiple button presses and makes the process straightforward.
Locate The Clock Button
Find the button labeled “Clock” on your microwave’s control panel. It is usually near the number pad or timer buttons. Press and hold this button for about three seconds.
Enter The Current Time
After holding the clock button, the display will blink. Use the number pad to type the current time. Enter the hour first, then the minutes. Make sure to use the correct AM or PM format if your microwave requires it.
Save The Time Setting
Press the clock button again to save the time. The blinking on the display will stop, confirming the time is set. Your microwave clock is now ready to use.
Use Start Or Enter Button
The Start or Enter button plays a key role in setting the time on your GE microwave. After entering the correct time, pressing this button confirms and saves the setting. Without using this button, the microwave will not register the new time.
Using the Start or Enter button is simple and ensures your clock shows the right time. This step completes the process and allows the microwave to return to normal operation.
Press The Clock Button First
Find the button labeled “Clock” on your GE microwave. Press it once to start the time-setting mode. The display will begin blinking, showing that you can now enter the time.
Enter The Current Time
Use the number pad to type in the current time. Make sure to enter the time in the correct format, usually four digits for hours and minutes. For example, 0930 means 9:30.
Press Start Or Enter To Save
After typing the time, press the Start or Enter button to save it. The blinking colon on the display will stop, showing that the clock is set. Your microwave now shows the correct time.
Double Press Clock Button
The double press clock button method is a simple way to set the time on your GE microwave. It helps activate the clock setting mode quickly. This method avoids confusion by clearly signaling the microwave to accept the time input.
Pressing the clock button twice puts the microwave in time-setting mode. You will see the display start blinking, indicating it’s ready for you to enter the current time. This step is crucial before entering numbers.
Locate The Clock Button
Find the button labeled “Clock” on your GE microwave control panel. It may also say “Clock/Timer.” This button controls the clock setting function.
Double Press The Clock Button
Press the clock button two times quickly. The microwave display will start blinking. This means the clock is ready to be set.
Enter The Current Time
Use the number pad to enter the current time. Enter hours and minutes in a 12-hour format. Do not forget to include AM or PM if your microwave requires it.
Confirm And Save The Time
Press the clock button once more or the “Start” button to save the time. The blinking will stop, showing that the clock is set correctly.
Reset Microwave Clock
Resetting the microwave clock is a simple task. It helps keep your microwave’s time accurate. A correct clock ensures your cooking times are precise. This guide explains how to reset the clock on a GE microwave quickly.
Most GE microwaves have similar controls. You will use the “Clock” button and number pad to set the time. Follow the steps below to reset your microwave clock without any hassle.
Press The Clock Button
Find the button labeled “Clock” or “Clock/Timer”. Press this button once to start the clock setting mode. The clock display will start blinking. This means you can now enter the time.
Enter The Current Time
Use the number pad to enter the correct time. For example, for 3:45, press 3, 4, then 5. Enter the time in a four-digit format. Make sure to enter the time carefully to avoid errors.
Confirm And Save The Time
Press the “Clock” button again or the “Enter” button. This saves the time you entered. The blinking on the display will stop, showing the clock is set. Your microwave clock is now reset and ready to use.
Tips For Older Models
Setting the time on your GE microwave usually works smoothly. Sometimes, issues can stop the clock from setting correctly. Common troubleshooting steps help fix these small problems fast. They make sure your microwave clock shows the right time.
Checking the basics first saves time and avoids frustration. Small errors in pressing buttons or power interruptions often cause the clock to reset or not set. Follow these tips to keep your microwave clock accurate.
Check The Power Supply
Ensure the microwave is plugged in properly. A loose plug or power outage can reset the clock. If the microwave lost power recently, the clock may need resetting.
Try unplugging the microwave for 30 seconds. Plug it back in and attempt to set the time again. This simple reset can fix many clock issues.
Use The Correct Clock Button
Locate the “Clock” or “Clock/Timer” button on the control panel. Press it once or twice as per your model’s instructions. Pressing the wrong button can cause confusion.
After pressing the button, enter the time using the number pad. Confirm the time by pressing “Clock” or “Enter” again. The blinking colon should stop, showing the clock is set.
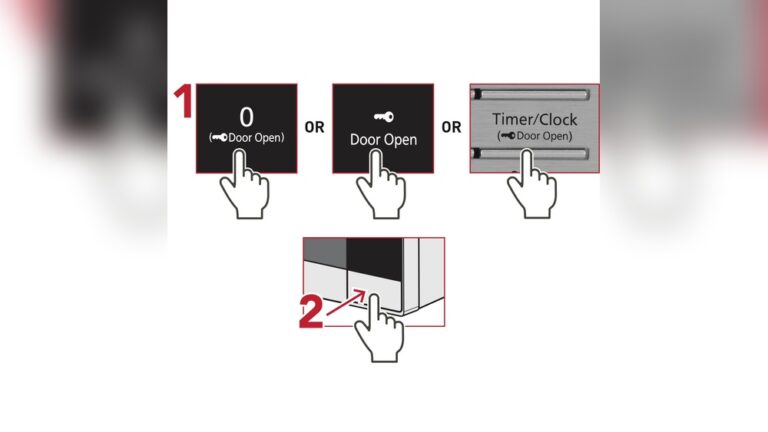
Check The Control Panel For Lock Or Child Lock
Some GE microwaves have a control lock feature. This feature prevents changes to settings, including the clock. Look for a lock icon or message on the display.
To disable the lock, press and hold the “Stop/Cancel” or “Clear” button for a few seconds. When the lock turns off, try setting the clock again.
Reset The Microwave
Resetting the microwave clears minor glitches. Unplug the microwave for one minute. Plug it back in and try setting the clock again.
This step refreshes the microwave’s electronics and often resolves clock setting problems.
Frequently Asked Questions
How To Set The Clock On The Microwave?
Press the “Clock” button, enter the current time using the number pad, then press “Clock,” “Enter,” or “Start” to save. Some models require holding the “Clock” button or pressing it twice. Check your microwave manual for exact steps.
How To Reset A Ge Microwave?
To reset a GE microwave, unplug it for 1-2 minutes. Plug it back in to restore factory settings. Then, set the clock.
How To Change Clock On Ge Oven Without Clock Button?
Press the “Settings” or “Menu” button on your GE oven. Use arrow keys to find “Clock” or “Time. ” Enter the correct time with number pads and press “Start” or “Enter” to save. Check your model’s manual for exact steps.
Conclusion
Setting the time on your GE microwave is simple and quick. Just press the Clock button, enter the correct time, and save it. This helps your microwave show the right time and keeps your cooking on track. If your model uses a different method, check the manual or try holding the Clock button longer.
Keeping the clock accurate makes your microwave easier to use daily. Now, your GE microwave is ready to serve you better every day.