How to Install a Lg Over the Range Microwave Oven: Easy Step-by-Step Guide
Thinking about upgrading your kitchen with a sleek LG over-the-range microwave oven? Installing one yourself can save you money and give you a great sense of accomplishment.
But you might be wondering, “Can I really do this on my own? ” The good news is yes—you can! With the right tools, a little patience, and a helping hand, you’ll have your new microwave mounted securely and ready to use in no time.
In this guide, you’ll find clear, step-by-step instructions designed just for you, making the process straightforward and stress-free. Let’s dive in and turn your kitchen upgrade dream into reality!

Credit: www.youtube.com
Tools And Materials Needed
Preparing for your LG over-the-range microwave installation starts with gathering the right tools and materials. Having everything at hand makes the process smoother and safer. It also helps avoid delays during installation. Below are the key items needed to complete this project successfully.
Essential Tools
- Power drill with drill bits
- Phillips and flathead screwdrivers
- Stud finder to locate wall studs
- Level to ensure straight mounting
- Tape measure for precise measurements
- Pencil or marker for marking holes
- Socket wrench or adjustable wrench
Mounting Hardware And Template
Use the mounting hardware included with your microwave. This typically contains screws, bolts, and brackets. The installation template helps mark drill points on the wall. It ensures correct positioning and alignment. Double-check that all pieces are in the box before starting.
Safety Gear
- Safety glasses to protect your eyes
- Work gloves for hand protection
- Dust mask if drilling into drywall or wood
Safety gear reduces risk of injury during installation. Wear these items throughout the entire process.
Credit: www.homedepot.com
Pre-installation Preparation
Preparing well before installing your LG over-the-range microwave is essential. This step helps ensure safety and a smooth setup process. Careful planning saves time and avoids damage to your kitchen.
Follow these key preparation tasks before starting the installation.
Check Measurements
Measure the space above your range carefully. Compare it with the microwave’s dimensions. Make sure the microwave fits without obstruction. Check cabinet height and width too. Accurate measurements prevent installation issues later.
Confirm Electrical Requirements
Verify the electrical outlet matches the microwave’s power needs. Most LG models need a 120-volt, 15-amp circuit. Confirm the outlet is grounded and easily accessible. Improper power supply can cause problems or hazards.
Plan For Assistance
The microwave is heavy and bulky. Arrange for a helper to lift and hold it during installation. Two people reduce the risk of dropping or damaging the unit. Teamwork makes the process safer and faster.
Protect Your Cooktop
Cover your cooktop with a soft cloth or towel. This prevents scratches from tools or the microwave. Keep the area clean of grease and debris. A protected cooktop stays in good condition throughout the installation.
Turn Off Power
Switch off power to the kitchen circuit at the breaker box. Confirm the power is off by testing the outlet with a voltage tester. This step prevents electric shock during installation. Safety first.
Removing The Old Microwave
Removing the old microwave is the first step to install your new LG over-the-range microwave oven. This process requires care to avoid damage and ensure safety. You need to prepare properly before lifting the old unit off the wall.
Make sure to have a helper nearby. The microwave is heavy and can be awkward to handle alone. Keep tools ready and stay organized for a smooth removal process.
Unplug And Unscrew
Start by unplugging the microwave from the electrical outlet. This stops any power flow and keeps you safe. Next, locate all screws that secure the microwave to the cabinet and wall.
Use a screwdriver to remove these screws carefully. Keep them safe for later use if you want to reinstall. Make sure no screws remain hidden behind the microwave.
Support And Remove
Have your helper support the microwave’s weight from underneath. This step prevents the unit from falling once loose. Slowly pull the microwave away from the wall and cabinet.
Lower it gently and place it on a soft surface. Avoid sudden movements to protect the microwave and your kitchen. Check the area for any leftover mounting hardware or debris.
Mounting Bracket Installation
Installing the mounting bracket is a key step in securing your LG over-the-range microwave. This bracket holds the microwave firmly to the wall and ensures safety during use. Taking time to install it correctly prevents future issues and keeps the appliance stable.
Use The Template
Start by unpacking the mounting template that comes with your microwave. Place it on the wall above your range, aligning it with the cabinet bottom. The template shows exactly where to mark holes for screws and anchors. Mark these spots clearly with a pencil to guide your drilling.
Locate Studs
Studs provide strong support for heavy appliances like microwaves. Use a stud finder to locate the wooden studs behind your wall. Mark the edges of each stud to find the center. Make sure your bracket’s screw holes line up with these stud centers. This step ensures the bracket holds tight and safely supports the microwave’s weight.
Drill Pilot Holes
Drilling pilot holes makes it easier to insert screws and prevents the wall from cracking. Use a drill bit slightly smaller than the screw diameter. Drill holes at the marked locations on the wall. Keep the drill steady and straight. This prepares the wall for secure bracket attachment and avoids damage.
Attach And Level Bracket
Position the mounting bracket on the wall, matching the pilot holes. Insert screws into the holes and tighten them firmly. Use a level tool to check the bracket’s alignment. Adjust screws if needed to keep the bracket perfectly horizontal. A level bracket helps your microwave fit properly and operate safely.
Vent Adjustment And Setup
Setting up the vent for your LG over-the-range microwave is key. Proper vent adjustment ensures smoke and odors leave your kitchen effectively. This step improves air quality and keeps your kitchen fresh during cooking. Follow the instructions carefully to match your kitchen’s vent type.
External Venting
External venting sends air outside your home. Your microwave connects to ductwork that leads outdoors. First, remove the vent cover on the microwave’s top or back. Attach the duct to the vent outlet securely. Use metal tape to seal gaps and prevent leaks. Check the vent fan motor is in place and works properly. Align the duct so air flows freely without bends or blockages. This setup removes smoke and heat from your kitchen.
Recirculating Venting
Recirculating venting cleans air and sends it back inside. The microwave uses a charcoal filter to trap odors and grease. Install the charcoal filter inside the vent cover or on the vent fan. Make sure the filter fits snugly and covers the entire vent opening. The vent fan pulls cooking fumes through the filter. Replace the charcoal filter every few months for best results. This option works well when your kitchen lacks outside venting.
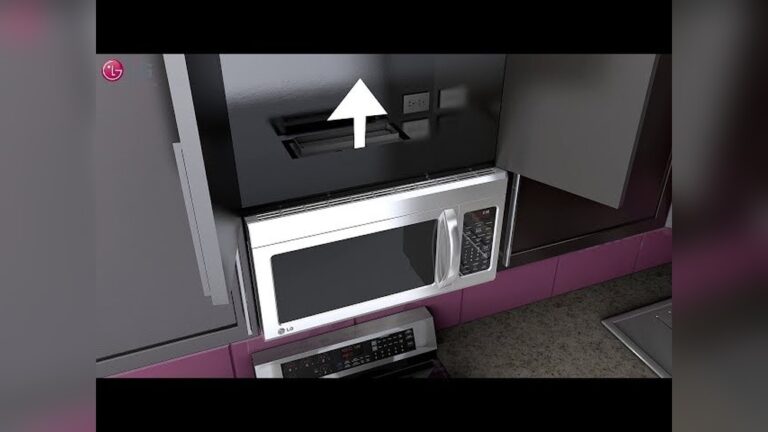
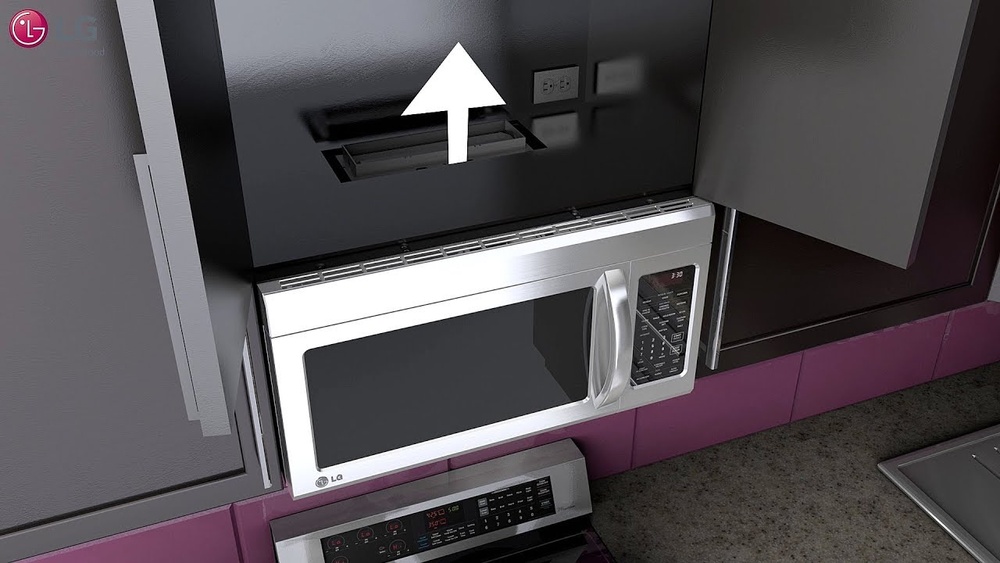
Hanging The New Microwave
Hanging the new LG over-the-range microwave is a key step in the installation process. This task requires care and precision. It ensures the microwave fits securely and functions safely above your stove.
Having a second person to help will make lifting and positioning easier. Follow the steps below to mount your microwave correctly.
Lift And Position
Start by lifting the microwave carefully with your helper. Align the back of the microwave with the mounting bracket on the wall. Tilt the top of the microwave up to hook it onto the bracket. Make sure it sits firmly before releasing it. Check that the microwave is level and stable.
Route Power Cord
Next, guide the power cord through the space provided at the back or side. Avoid sharp bends or pinching the cord. Plug the cord into the electrical outlet inside the cabinet or wall box. Ensure the cord has enough slack for easy connection without strain.
Use Wood Blocks For Fit
Place wood blocks under the microwave to support its weight during final adjustments. These blocks help keep the microwave at the right height for securing screws. After tightening the mounting screws, remove the blocks carefully. This step prevents damage and ensures a snug, safe fit.
Securing The Microwave
Securing the microwave is a critical step in the installation process. It ensures the unit stays firmly in place during use. Proper securing prevents movement and potential damage. Use the correct screws and follow precise mounting instructions. This section explains how to secure your LG over-the-range microwave safely and effectively.
Drive Mounting Screws
Start by aligning the microwave with the mounting bracket on the wall. Use the screws provided by LG for this task. Insert each screw into the designated holes on the microwave’s back panel. Tighten screws securely with a drill or screwdriver. Avoid overtightening to prevent damage. Confirm the microwave sits flush against the wall and bracket. This step stabilizes the unit before attaching it to the cabinet above.
Attach To Cabinet
Locate the mounting holes inside the cabinet above the microwave. Lift the microwave carefully with the help of another person. Align the microwave’s top mounting holes with the cabinet holes. Insert the cabinet mounting screws through the microwave and into the cabinet. Tighten screws firmly to secure the microwave to the cabinet. Check that the microwave does not shift or tilt. This attachment adds extra support and ensures safe daily use.

Credit: www.lg.com
Final Steps
After securely hanging your LG over-the-range microwave, focus shifts to the final steps. These actions ensure the microwave is safely powered and fully functional. Carefully completing these last tasks guarantees reliable operation and your safety.
Restore Power
Turn the circuit breaker back on to restore electricity. Check the power switch or plug to confirm it is connected. Avoid rushing this step to prevent any electrical issues. Once power is restored, the microwave will be ready for testing.
Test Microwave Operation
Press the power or start button to test the microwave. Listen for the fan and watch the display panel light up. Heat a small cup of water to verify heating function. Check the vent fan and light to ensure they work correctly. Confirm all buttons respond and the door closes securely.
Frequently Asked Questions
Can I Install An Over The Range Microwave Myself?
Yes, you can install an over-the-range microwave yourself. It requires basic tools, careful measuring, and a helper for lifting. Follow the manufacturer’s instructions for safety, ensure proper electrical setup, and secure mounting to studs for a stable installation.
Does An Lg Over The Range Microwave Need To Be Vented?
Yes, LG over-the-range microwaves require venting. They can vent externally or recirculate air with a charcoal filter. Proper venting ensures smoke and odors exit your kitchen.
What Is The Lg Microwave Class Action Lawsuit?
The LG microwave class action lawsuit addresses defects causing overheating and fire risks. Plaintiffs seek compensation for damages and repairs.
Conclusion
Installing your LG over-the-range microwave is doable with the right tools. Take your time and follow each step carefully. Make sure the unit is secure and level before use. Ask for help when lifting the microwave to avoid injury. Double-check electrical connections for safety and proper operation.
Enjoy the convenience and extra space it brings to your kitchen. A well-installed microwave adds value and comfort to your home. Keep the user manual handy for future reference. Simple steps lead to great results.