How to Clean Sponges in the Microwave: Quick & Easy Guide
Your kitchen sponge works hard every day, soaking up food messes and germs you can’t even see. But did you know your sponge could actually be making your kitchen less clean if it’s full of bacteria?
The good news is you can easily kill those germs and refresh your sponge using something you already have—your microwave. In just a couple of minutes, you’ll learn a simple, safe way to sanitize your sponge, keeping your kitchen healthier and your cleaning routine smarter.
Ready to discover how to clean sponges in the microwave and protect your family from hidden bacteria? Keep reading, and you’ll never look at your sponge the same way again!
Preparing The Sponge
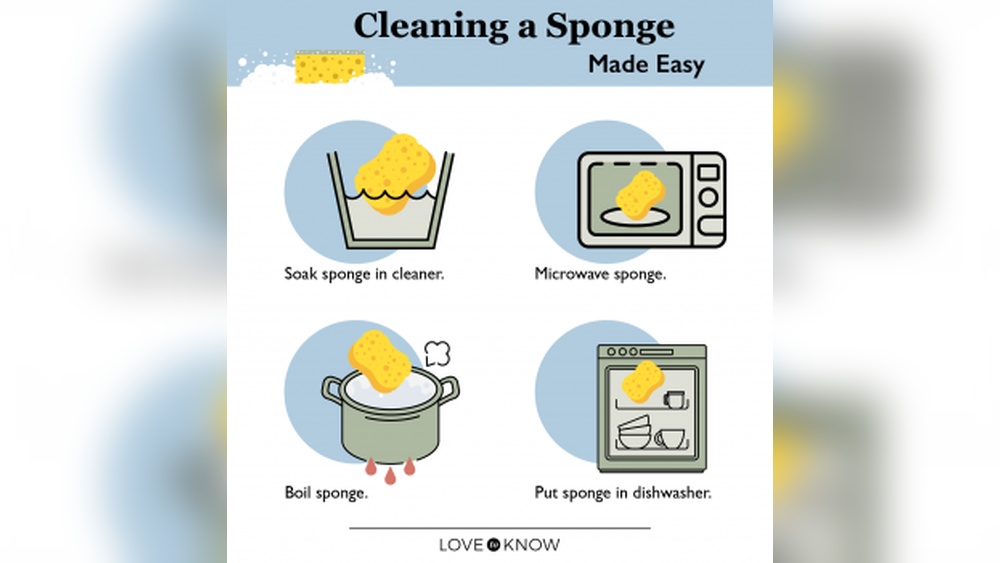
Preparing your sponge correctly is essential for effective cleaning in the microwave. This step ensures safety and maximizes the sponge’s ability to kill bacteria. Follow simple actions to get your sponge ready before microwaving.
Proper preparation helps the sponge produce steam. Steam is the key to sanitizing and removing germs inside the sponge. Skipping these steps can reduce cleaning power or cause damage.
Wet The Sponge Thoroughly
Start by soaking the sponge with clean water. The sponge must be fully wet, not just damp. Water creates steam in the microwave, which kills most bacteria and germs.
Make sure the sponge feels heavy with water. If it is dry or only slightly wet, it can catch fire or burn. Always check the sponge’s moisture before placing it inside the microwave.
Remove Metal Components
Check the sponge for any metal parts like scrubbing pads or wires. Metal can cause sparks and damage the microwave. Remove these parts carefully before heating the sponge.
Only microwave sponges that are completely free of metal. This step is very important for safety. Using a sponge with metal inside can start a fire or break your microwave.
Microwaving Process
Cleaning sponges in the microwave is a simple and quick way to kill germs. The heat and steam work together to sanitize the sponge effectively. Follow these steps carefully to ensure safe and proper cleaning.
Set Microwave Timer
First, wet the sponge completely with water. This creates steam that helps kill bacteria. Place the wet sponge in the microwave. Set the timer for one to two minutes on high power. Heating for this time kills most germs inside the sponge. Avoid overheating to prevent damage or fire risk.
Use Microwave-safe Plate
Always place the sponge on a microwave-safe plate. This prevents any mess from water dripping. The plate also helps keep the sponge steady during heating. Avoid using metal or non-microwave-safe containers. These can cause sparks and damage your microwave. After microwaving, use tongs or oven mitts to remove the hot sponge safely.
Handling The Sponge After Microwaving
Handling the sponge after microwaving is important for safety and effectiveness. The sponge will be hot and wet. Careful steps help avoid burns and keep the sponge clean for use.
Follow simple actions to remove, cool, and prepare the sponge. This process helps maintain hygiene and extends sponge life.
Remove Sponge Safely
Use tongs or oven mitts to take the sponge out of the microwave. Avoid touching it with bare hands. The sponge can be very hot right after microwaving. Handle it carefully to prevent burns.
Let It Cool
Place the sponge on a heat-safe surface. Let it cool for a few minutes. Cooling stops heat damage to your hands and counters. It also lets steam escape safely before squeezing.
Squeeze Out Excess Water
After cooling, gently squeeze the sponge to remove water. Do not twist too hard to avoid damage. Removing water helps the sponge dry faster. A dryer sponge stays fresher and cleaner longer.

Credit: www.whirlpool.com
Frequency Of Cleaning
Cleaning your kitchen sponge in the microwave helps kill bacteria and keeps it fresh. How often you clean your sponge depends on how much you use it. Regular cleaning prevents bad smells and germs from building up. Below are simple guidelines for sponge cleaning frequency based on usage.
Daily Cleaning For Heavy Use
If you use your sponge many times a day, clean it daily in the microwave. Heavy use means more bacteria and food residue. Wet the sponge fully before microwaving it on high for one to two minutes. This routine stops germs from spreading and keeps your sponge safe to use.
Weekly Cleaning For General Use
For normal kitchen tasks, cleaning the sponge once a week usually works well. This is enough to remove most bacteria and odors. Make sure to soak the sponge in water before microwaving it. Running the microwave on high for one to two minutes disinfects it properly. Replace sponges every one to two weeks for best results.
Safety Tips
Cleaning sponges in the microwave is a quick way to kill germs. Safety is very important to avoid accidents. Follow these tips to keep the process safe and effective.
Avoid Dry Sponges In Microwave
Never microwave a dry sponge. A dry sponge can catch fire easily. Always soak the sponge with water before microwaving. The water creates steam that kills bacteria. This also protects the sponge from burning.
Check For Metal To Prevent Sparks
Check the sponge for any metal parts. Some sponges have scrubbers with metal threads. Metal in the microwave causes sparks and fires. Remove any sponge with metal or use a metal-free sponge. Safety first to avoid damage and danger.
:max_bytes(150000):strip_icc()/do-not-microwave-sponge-to-clean-it-GettyImages-1398119159-83948f16a8cd43aebd169f42cd2d1ff8.jpg)
Credit: www.realsimple.com
When To Replace Your Sponge
Knowing when to replace your sponge is key for a clean kitchen. Sponges wear out over time and lose their ability to clean effectively. Using old sponges can spread germs and bacteria, even if you clean them in the microwave. Watch for certain signs to decide if it is time for a new sponge.
Signs Of Wear And Tear
Check your sponge daily for damage. Look for cracks, holes, or frayed edges. These damages trap dirt and germs inside the sponge. A sponge that falls apart during use needs to be replaced. A soft, mushy texture also means the sponge is worn out. Do not keep sponges that look broken or feel weak.
Odor And Hygiene Indicators
Bad smells are a clear sign to change your sponge. A foul odor means bacteria are growing inside. Even after microwaving, some sponges keep a bad smell. If your sponge smells sour or rotten, throw it away. Also, if it feels slimy or sticky, it is no longer hygienic. Always replace sponges that seem dirty or smell bad to protect your health.

Credit: www.youtube.com
Frequently Asked Questions
How Do I Sanitize A Sponge In The Microwave?
To sanitize a sponge in the microwave, wet it fully and ensure no metal parts. Microwave on high for 1–2 minutes. Use tongs to remove carefully, let it cool, then squeeze out excess water before use. Repeat daily for best results.
How Long Do You Put A Wet Sponge In The Microwave To Clean It?
Place a thoroughly wet sponge in the microwave and heat on high for 1 to 2 minutes to kill bacteria. Use tongs to remove it carefully, let it cool, then squeeze out excess water before reuse.
How Often Should I Microwave My Sponge?
Microwave your wet sponge daily to kill bacteria effectively. Replace sponges every one to two weeks or when worn.
What Does Putting A Sponge In The Microwave Do?
Putting a wet sponge in the microwave for 1-2 minutes kills bacteria using steam heat. Avoid metal parts to prevent sparks. Let it cool before use.
Conclusion
Cleaning sponges in the microwave is quick and effective. Always wet your sponge before microwaving to avoid fires. Heat it on high for one to two minutes to kill germs. Use tongs or oven mitts to remove the hot sponge safely.
Let it cool and squeeze out extra water before using again. Doing this regularly keeps your sponge cleaner and reduces bacteria. Remember to replace sponges every one to two weeks for the best hygiene. Simple steps like these help maintain a healthier kitchen environment.